Friday, 30 September 2011

Cinnamon French Toast


Hey everyone! Yesterday and today are "getting rid of left-overs" day! We are going home to Calicut (Reju's place) for the weekend and so I'm in a spree to finish up food and veggies in the refrigerator. Today's recipe is an outcome of the same. I had some left-over bread in the refrigerator and thus thought I'll prepare a french toast with a twist! I'm sure we all love french toast, I used to love it as a young girl. And today I cooked up a cinnamon flavoured french toast for breakfast. And if you're thinking everyday about what snack to send your lil munchkins for school, here is a perfect snack and an all day breakfast! I assure you that their lunch boxes will be empty in  a jiffy. The ingredients are very simple. This dish is easy to make and yummy to taste!

Weekends and going home always makes me feel upbeat. I hope you enjoy this moist and subtly spiced french toast I have for you today. Have a pleasant weekend my blogger friends.

Ingredients

Bread slices - 8
Eggs - 3 (refer notes)
Milk - 1/4 cup and a little more
Vanilla extract - 1/4 tsp
Sugar - 1 tsp (optional)
Cinnamon (ground) - 1/4 to 1/2 tsp
Nutmeg (ground) - a dash
Butter

Method

In a shallow bowl, whisk eggs until slightly fluffy. Whisk in the milk, vanilla essence, ground cinnamon, ground nutmeg and sugar. Heat butter in a heavy skillet or non-stick pan over medium-low heat. Dip each slice of bread (one by one) in the egg mixture, turning to coat thoroughly. Let excess drip back into bowl.

Place coated bread slices on the hot skillet or non-stick pan. Cook, turning until both sides are nicely browned. Be careful not to burn the bread slices.

Transfer to a warm plate and keep warm in a 200°C pre-heated oven. Repeat with remaining bread and egg mixture. Serve hot with cinnamon and sugar sprinkled on top (optional) or with maple syrup, honey or any syrup of your choice.

Notes:

1. For the healthier version, you can use 1 whole egg and 2 egg whites and avoid the sugar because the syrup or honey contains enough sweetness.

2. Warming up the bread in the oven is optional. You can eat it hot directly taken off the skillet/non-stick pan.

Thursday, 29 September 2011

Lemon Rice


Lemon rice always reminds me of school days where during lunch breaks, we would all share our tiffins (lunch box) filled with delicious home-made food. These were licked clean as if we were deprived of food for years! I was a poor eater at that time (wish I was like that even now!) and so never ate much from my tiffin but picked on food from my friends's tiffins while my friends's wiped clean my tiffin. Thus it was a win-win situation! Nonetheless, I also had to finish my tiffin or my mom wouldn't be a happy camper. So I generously let all my friends's gobble down my food while I devoured theirs!

Lemon rice was a hot favourite among my friends and was especially yummy during the hot and humid weather.

Food and music always make me nostalgic and take me back to those good old days. I am sure you have your own stories and memories surrounding some kind of food and I hope while you enjoy my recipe today beautiful memories conjure up flooding you with happiness.

Ingredients

Rice (Sona Masoori) - 1 cup
Lemon juice - juice of 2 to 2 1/2 lemons
Shallots/Small/Pearl onions - 5 to 8
Mustard seeds - 1/4 tsp
Green chillies - 2
Ginger - 1 small piece
Turmeric powder - 1/2 tsp
Asofetida powder (Hing) - a pinch
Black gram (urad dal) - 1 tbsp
Bengal gram (chana dal) - 1 tsp
Peanuts - 1/2 cup (dry roasted)
Cashew - 8 to 10 (fried)
Curry leaves - a few
Coriander leaves - small bunch
Ghee - 1 tsp (optional)
Salt - to taste
Oil


Method

Cook the rice and keep aside. (You can add a pinch of salt while cooking the rice and adjust salt again later) Dry roast the peanuts and keep aside. Fry the cashew in a little ghee/oil and keep aside.

Heat oil in a wok and splutter mustard seeds. Add black gram (urad dal), bengal gram (chana dal) and saut'e till colour changes. Now add green chillies, ginger, shallots/small/pearl onions, curry leaves and and saut'e till onions turn light brown. Add half of the coriander leaves, turmeric powder and asofetida (hing) powder and saut'e for a few minutes. Add salt and mix. Now add the cooked rice and mix till everything is combined well. Add lemon juice and the rest of the coriander leaves and toss till everything is mixed well and high steam comes. After cooking the rice on a high flame for a few minutes (3 to 4 minutes), turn the flame to low and cook for another 2 to 3 minutes. Switch off the flame and add the roasted peanuts and cashew with a pinch of ghee (optional) and toss once again.

Serve hot or cold with yoghurt, a pickle of your choice and pappad or as it is. Enjoy!

Notes:

The rice must cool down well, if you do not have prepared rice from previous day. The rice grains should be separated and lumps should be avoided.

You can fry the peanuts in ghee/oil just like cashew instead of dry roasting them.

Wednesday, 28 September 2011

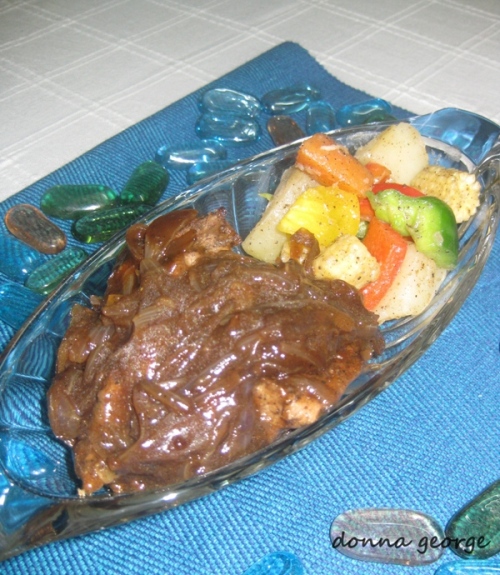
Chinese Chicken Bake


I love chicken baked like this, simple and yummy! This recipe is inspired by my mama (as is most of the time) She had quite a few awesome preparations for 'chicken bake' (will show you more preparations in later posts) of which this was an all time favourite. This bake was one of the first dishes I made for Reju after our marriage and he loved it each time I made it. It can be eaten with nice fresh bread or even as a meal on its own.

This dish is by far one of the easiest dishes I have made, a real life saver when you are absolutely lazy to cook and stay long hours in the kitchen. And yesterday was one of those days and thus decided to give it a whirl myself. Not disappointed at all, and will definitely keep making it often.

Ingredients

Chicken - 10 to 12 pieces (approx)
Big onions – 2 (big; finely sliced)
Potatoes – 2 (parboiled; cut into medium sized cubes) (refer notes)
Assorted veggies - 2 cups (parboiled; cut into small cubes) (refer notes)
Freshly crushed garlic - 4 to 5 cloves
Pepper - 1/2 to 3/4 tsp (adjust as per spice tolerance)
Salt - to taste
Cornflour - 1 tsp
Oil
Butter

For Marinade

Ginger & Garlic paste - 1 ½ tsp
Pepper - 2 to 3 tsp (adjust as per spice tolerance)
Salt - to taste
Chilli garlic sauce - 1 tbsp
Tomato sauce - 1 tbsp
Green chilli sauce – 1 tbsp
Soy sauce – 1tbsp (I have used dark soy, you can use light soy too)

Method

Make gashes in the chicken and marinate it with the ingredients listed under “For Marinade” and let it rest for 3 to 4 few hours in the refrigerator. (overnight marination is the best)

Parboil the assorted veggies and keep aside. Heat oil in a wok and sauté the sliced big onions along with a pinch of sugar (Sugar is added for caramelization which adds to the lovely rich colour and delicious flavour) till it turns golden brown. Once done, keep aside. Sauté cubed potatoes and assorted veggies in a little butter with a dash of pepper, salt and crushed garlic and keep aside.

Then take a baking dish, grease it with butter and arrange the chicken pieces on it. Add small blops of butter on the chicken pieces here and there. Cover the dish with aluminium foil. Preheat the oven at 100°C for 15 minutes. Then place the chicken in the oven at 250°C for 10 to 12 minutes and then leave it at 180°C for half an hour. At the end of half an hour, take out the chicken pieces and flip them over. Take the gravy/juices from baking dish and keep aside. Remove the aluminium foil and place it back in the oven for 15 to 20 minutes at the same temperature. (or till chicken is cooked till crisp) Once done, take out from the oven and place on serving dish. (If the baking dish is a 'Bake & Serve' dish, leave the chicken pieces in the same dish)

Preparation of Sauce

Mix the cornflour with the gravy and keep aside. Now heat oil in a wok and add the gravy into it. Add the browned onions and mix well. Keep stirring till the gravy thickens, switch off the flame and pour this sauce over the baked chicken.

Serve with assorted veggies and fresh bread or as a whole meal.

Notes:

1. Veggies I used were red, yellow and green bell peppers, potatoes, carrots and baby corn. You can also use brocolli or other veggies of your choice. Do not parboil the bell peppers.

2. You can replace the regular potatoes with baby potatoes. You can also make a mashed potato to go with this.

3. You will see that the top of the chicken looks blackish, don't worry it’s not burnt, its just the soy sauce’s rich colour.

Source: Mama

Monday, 26 September 2011

Kerala Style Tomato Fish Curry


Kerala is a southern state in India bound by the Arabian Sea on it's west. This coastline is a beautiful state filled with lush greenery on all sides mainly comprising of tall coconut trees and the clear blue waters that add to our culture and unique cuisine. The variety of fish we enjoy from the sea our diverse and obviously holds an important part in Kerala cuisine. And thus that is why we see that a large population in Kerala are non-vegetarian, unlike most other states in India.

Personally, I like vegetarian food. I’m not too much of a meat eater unlike my hubby dearest who loves any kind of meat, be it chicken, beef or anything. But to me, fish is very 'vegetarian' because back home, fish was a part of our daily menu almost everyday. When I left for college and had to stay in a hostel (which was so much fun) I always missed my mum’s fish curry and fry. But I must say the food in that hostel was much better compared to other hostels. The fish fry, beef cutlets, chicken curry, gobi manchurian, everything was fantastic.

Today I want to share one of my favourite fish recipes, fish curry prepared with tomato and coconut milk. Fish like I said holds pride and a very important part in our cuisine and I promise you this dish makes the fish so tasty and juicy on the inside, it will leave you wanting more. Hope the taste will transport you to the breezy, coconut swaying coastlines of Kerala.

Ingredients

Fish - 1/2 kg (7 to 8 pieces approx)
Mustard seeds - 1/4 tsp
Big Onions - 2
Tomato - 2 (big)
Ginger & Garlic paste - 2 tsp
Red Chilli powder - 1 tbsp; heaped (alter as per spice tolerance)
Turmeric powder - 1/4 tsp
Thin Coconut milk - 1 1/4 cup
Thick Coconut milk - 1/4 to 1/2 cup
Fenugreek powder (uluva podichathu) - 1/4 tsp
Coconut oil
Curry leaves - 2 sprigs
Salt - to taste

Method

Heat oil in a meen chatti (earthenware) or any wok and splutter mustard seeds. Add onions and saut'e till light brown. Once the onions have browned, add ginger & garlic paste and saute for a few minutes till raw smell goes away. Then throw in the red chilli powder and turmeric powder and saut'e till raw smell goes away. Sprinkle a little water to moisten the masala. Now add the tomatoes and salt and saut'e till oil floats. Add the thin coconut milk along with the fenugreek powder and let it boil. Once it starts boiling, add the fish pieces. Let it cook on a high flame for a few minutes and then switch over to  a low flame and let the fish cook till done and gravy reduces. Once the fish has been cooked well, add the thick coconut milk and stir for a few minutes. Do not let it boil too much. Garnish with fresh coconut oil and curry leaves. Serve with rice, chapathi or appam.

Source: Mama

Sunday, 25 September 2011

Pear Squash Thoran/Chow Chow Stir Fried with Grated Coconut


Popularly known as Pear Squash or Chow Chow in India, this veggie belongs to the gourd family Cucurbitaceae, along with melons, cucumbers and squash. This veggie is used in both raw and cooked forms. When cooked, pear squash is generally lightly cooked to retain the crisp flavour. Raw pear squash may be added to salads or salsas and is often marinated with lemon or lime juice.

In this recipe I have cooked the pear squash lightly and stir fried it with grated coconut and subtle aromatics which helps get rid of the bland flavour of the veggie. What I love about this dish is it's simplicity.

Ingredients

Pear Squash/Chow Chow - 2 (chopped fine)
Curry Leaves
Rice grains or Black gram/Urad dal - few grains
Turmeric powder - a pinch
Curry leaves - 2 to 3 leaves
Salt - to taste
Oil

For Grinding

Coconut (grated) - 2 to 3 tbsp (you can add more coconut, adds to the flavour)
Shallots/Small/Pearl onions - 3 to 4
Garlic - 3 cloves
Green chillies – 1
Curry leaves – a few

Method

Grind all the ingredients listed under 'For Grinding' into a coarse mixture.

Heat oil in a wok. Once the oil becomes hot, add a few grains of rice or black gram/urad dal. When this turns slightly brown, splutter mustard seeds. Add the chopped pear squash/chow chow into it along with a few curry leaves and saut'e till the veggie reduces. (1 minute approx) Now add the ground coconut mixture and enough salt and mix well. Splash enough water  (2 to 3 splashes) to cook the veggie and cover and cook on a high flame till steam comes. Turn the flame to low and keep for a 1 or 2 minutes. Then remove the lid and keep saut'eing till done.

Saturday, 24 September 2011

Mathanga Erissery/Pumpkin Curry with Grated Coconut


The most common vegetable to make erissery is pumpkin and it is a well known and loved curry all over Kerala. And I (read it, my family) love this dish too and end up making it very often. Back home sometimes my mum cooks the pumpkin along with other legumes to produce the same curry. The pleasant sweetness of the pumpkin combined with the freshly grated coconut is definitely a treat to one's palate.

Today's recipe is my Mom's. When it comes to festive dishes or day to day dishes, my mum is always a great cook. She always took a lot of trouble cooking dishes we all liked and the food always paid off for all the trouble. And I think, one of the reasons she always experimented with new dishes and food was that my dad, sister and I constantly appreciated her cooking skills. (we still do!)...What do you say, Ma? Right or not?!! :)

So here is a recipe from a great cook, a great friend and the world's bestest mom....Love you, Ma. This one's for you.

Ingredients

Pumpkin/Mathanga - 1/4 kg (cut into small cubes)
Tuvar Dal - 1/4 cup
Water - 3/4 cup
Green chillies - 1 to 2
Turmeric powder - a pinch
Salt - to taste

For Grinding

Coconut (Grated) - 3/4 cup
Jeera - 1/4 tsp
Shallots/Small/Pearl onions - 6 to 8
Garlic - 3 to 4 cloves
Curry leaves

For Seasoning

Mustard seeds - 1/4 tsp
Coconut (grated) - 1 1/2 tbsp
Red chilli/Vattal Mulagu - 1
Curry leaves

Method

Cook the pumpkin/mathanga and tuvar dal with green chillies, curry leaves and salt in a pressure cooker. Once cooked, switch off the flame, mash this mixture well till smooth and transfer to another vessel.

Grind together grated coconut, jeera, shallots/small/pearl onions, garlic and curry leaves. Add the ground mixture into the pumpkin/mathanga curry and place this back on the stove and continuously stir it. Let it cook on a high flame for a few seconds and then turn the flame to low and stir till steam comes. (5 to 7 minutes approx) Now switch off the flame.

Heat oil in a wok and splutter mustard seeds. Add grated coconut, red chilli/vattal mulagu and curry leaves and saut'e till coconut turns light brown. Add this mixture to the curry and stir well.

Source: Mom

Friday, 23 September 2011

Achinga Payar Mezhukuperatti/Yard Long Beans Stir Fry


Saute'ed veggies are always an important part of a Kerala meal, it's safe to say it's universally preferred and today I have prepared the same using Achinga Payar. Famously known as Yard long beans, this veggie is a hot hot favourite in Kerala. The flavours incorporated into this dish are green chillies, onions, coconut pieces and coconut oil. Of course, you can play with the flavours as you like, some use different varieties of chillies either green or dry red chillies which alters the flavour slightly.

I have made some this afternoon in a very simple way and I will show you more ways of saute'eing this lovely vegetable in later posts. Hope you enjoy this simple dish. Have a good day.

Ingredients

Yard Long Beans - 30 (approx)
Coconut slices - 1/2 cup (medium size)
Big Onion - 1 1/2 (big)
Garlic - 5 to 6 cloves
Green chillies - 4 to 5 (adjust as per spice tolerance)
Turmeric powder - a pinch
Salt - to taste
Oil

Method

Cut the beans into small strips and keep aside. Take a vessel, add the beans along with all the above ingredients, pour in 2 to 3 sprinkles of water and cover and cook till done. (let all the water evaporate)

Heat oil in a pan, add the cooked beans mixture and stir fry till done.

Thursday, 22 September 2011

Meen Vevichathu/Fish Curry - Kottayam Style


I still have such fond memories of my holidays I used to spend at my grand parent's home. The man on a black ferry (vanji/vallom) would paddle by the small river at the backside of our home selling fish and other goodies. We even used to travel by these ferries to homes on the other side of the river bank. I still remember running out of bed with tousled hair and a puffy morning face with other children to catch fish from this little river. They had a very fascinating method of fishing. It was called "Kudukka" which were coconut shells filled with bait sealed with cloth and a tiny hole in the middle. These were placed at different spots in the river and within a few minutes these "kudukka" 's would be loaded with a myriad of fresh water fish. Of course there were other kinds of fish too (caught by the hook or net) like mackarel, sardines etc...

I was also very fascinated by the way this fish used to be cleaned. My ammachi's (that's what I call my paternal grandma) help (Pennamma) used to sit on a low stool (called korandi) and clean the fish under ammachi's supervision and I would be squatted nearby listening to ammachi's interesting stories and closely watching them trim the fins and tail dexterously off the fish and laying them into a clean pot nearby. There would be so much cleaning, rubbing it on stone and then tossing it around in the pot with rock salt. Of course, nowadays we get all our fish cleaned, skinned and filleted as per requirement and making a fish curry these days is one of the easiest tasks one could do.

Meen Vevichathu or this style of fish curry is the most sought after dish at every home in Kerala. As you already know I am a huge fan of fish in any form and thus decided to make a nice spicy Kottayam style Fish Curry for lunch today. Meen Vevichathu, I must say makes me feel instantly at home. Here is a simple yet delicious fish curry my family makes often. Hope you enjoy it as much as I do.

Ingredients

Fish - 1/2 kg (cut into medium size pieces)
Mustard seeds - 1 tsp
Fenugreek powder - 1/4 tsp
Ginger (finely chopped) - 1 inch piece
Garlic (finely chopped) - 8 to 10 cloves
Shallots/Small/Pearl onions - 10 to 12
Cocum/Kudampuli - 1 piece soaked in a little water for cleaning fish + 3 to 4 pieces (depending on sourness) soaked in 1/4 cup of water for cooking the fish
Turmeric powder - 1/2 tsp
Red Chilli powder - 1/2 tbsp
Kashmiri Chilli powder - 2 to 2 1/2 tbsp
Curry leaves - 2 sprigs
Coconut oil - 1 to 1 1/2 tbsp
Salt - to taste

Method

Wash and clean the fish with 1 piece of cocum/kudampuli soaked in water and keep aside. Mix turmeric powder and chilli powders with water to make a watery paste and keep aside. Heat the meen chatti (earthenware) or a pan and once hot pour oil into it. Splutter mustard seeds. Add chopped shallots/small/pearl onions, ginger, garlic and curry leaves and saut'e till onions become soft and the raw smell of the aromatics disappear. Now, add the masala paste and saut'e. Add about 3 to 4 splashes of water into this and keep frying till oil surfaces. Add a little more water and mix well. Then, add the soaked cocum/kudampuli along with the water and mix well. Add salt and bring it to a boil. When it starts boiling, add the fenugreek powder and stir well. At this time, add the fish pieces into it and cover and cook. When the curry starts boiling, cook for 1 or 2 minutes on a high flame and then reduce the flame to sim and cook the fish till done. (20 to 25 minutes approx) Make sure the gravy is thick. Serve with Rice or Kappa. (Tapioca)

Notes: The fish curry has to rest for a few hours before it is kept in the refrigerator. This helps enhance the flavour of the curry.

Source: Mom

Wednesday, 21 September 2011

Kothu Paratha


Hey everyone. Today was a busy day for me, loads of laundry, dusting of furniture, a little bit of cooking and such and so I was lazy to make a very elaborate dinner. Thus came up the idea of making Kothu Paratha with the left over parathas I had in my refrigerator. Kothu Porotta is a lip smacking dish and a hot favourite among South Indians.

Of course, this is not the original recipe for the dish. I got this recipe from Amma (Reju's mom) when she came home to spend a few days with us last week. I love all her recipes because they are so simple and delicious. Ever since amma left for Kerala, I have been flirting with the idea of making Kothu paratha and after trying out amma's recipe for the same and it's whopping success it was inevitable. This recipe is originally made with beef but I did it with chicken and made few changes from the recipe that Amma gave me. But the basic recipe remains the same.

This dish is a good snack but I think of it as more of a whole meal served hot with a cool cucumber and onion raita.

Thank you Amma for this lovely dish. I hope you enjoy this recipe and the dish too.

Ingredients

Wheat Parathas/chapathis - 6
Shredded chicken/minced beef - 250 gms (cooked)
Beef/chicken stock - 1/4 cup
Carrots (grated) - 1
Beans (julienned) - 4 to 5
Onion (big) - 1
Tomato (big) - 1
Ginger (finely chopped) - 1 tbsp
Garlic (crushed) - 4 to 5 cloves
Green chilli (slit lengthwise) - 1 to 2 (adjust as per spice tolerance)
Turmeric powder - 1/4 tsp
Kashmiri chilli powder - 1 tsp
Chicken masala - 1/4 tsp
Garam masala powder - 1/2 tsp to 3/4 tsp
Pepper powder - 1/2 tsp (adjust as per spice tolerance)
Coriander leaves
Salt - to taste
Oil

Method

Cook the beef/chicken with a little water along with a pinch of salt, pepper and a small piece of ginger. Cut the parathas/chapathis into small squares/tiny pieces. Keep them aside. Heat oil in a wok and saut'e green chilly, ginger and onions till onions turn light brown. Once the onions have browned, add the grated carrots and beans into it, saut'e and cover and cook for about 2 minutes. Now throw in the turmeric powder, kashmiri chilli powder, garam masala powder, chicken masala and pepper powders and saut'e till raw smell goes away. Then add the garlic and saut'e for a few minutes. Now add the tomato and saut'e till oil floats and tomatoes turn soft. Now add the shredded chicken/minced meat into it and toss till everything is combined well. Add salt and mix well. Close with a lid for a few minutes till the meat turns soft and succulent. Now add the chopped up parathas/chapathis and combine well. At this point, add the beef/chicken stock into it and mix well. Toss for about 1 or 2 minutes on a medium flame and then turn the flame down to sim and cover and cook for 3 to 4 minutes. Now add the coriander leaves into it and toss. Switch off the flame. Do not dry out the mixture, make sure it is moist.

Notes: I have made the healthier version using wheat parathas/chapathis. The dish is originally made with Kerala porottas/malabar parottas.

You can also incorporate eggs into the dish, (the original recipe calls for the same) it adds to the flavour.

Source: Superchef Amma

Pan Fried Meat Cutlets


My hubby's cousin had a sweet lil daughter few months ago and now she is back home with the sweetheart and is busy settling down. Poor thing, she has been away for a few months and so it must be extremely difficult getting things in order. So I thought why not cook up a few goodies for her so she doesn't have to do much cooking next week.

And so I thought cutlets would be a good idea. Cutlet is such a common snack in India that almost anybody would know how to make it. But beef and mutton cutlets are a familiar sight mostly in Kerala given the largely vegetarian  population of other places in India.

Back home, my mom would always stock up meat (beef) cutlets in her freezer because we used to have unexpected guests all the time and cutlets always helped make up for the absence of any other non-veg dish. My sister and I used to polish off a good number of them at a sitting. Cutlets are usually deep fried, but I don't use that method. I only shallow fry them with drizzles of oil on a non-stick pan. You can also grill them.

Anyways, cutlets are a great snack when you have company or otherwise. You might think that the procedure is all too long and painful but in reality it is not so.

This definitely is a winner with young and old alike. Hope you enjoy it.

Ingredients

Beef - 1/2 kg
Vinegar - 1 to 1 1/2 tbsp
Water - 1/4 to 1/2 cup
Big onion - 2 (big)
Ginger - 1/2 inch piece
Garlic - 2 cloves (optional)
Green chilli - 2 to 3
Pepper - 3/4 tsp (adjust as per spice tolerance)
Potato - 2 (big; boiled & mashed)
Curry leaves
Egg - 2 (beaten)
Breadcrumbs
Oil

Method

Boil and cook the beef in a pressure cooker along with a pinch of salt, vinegar and water till done. Let all the water evaporate.

Finely chop ginger, garlic, green chillies and onions. Also, mince the cooked beef and keep aside.

Heat oil in a wok. Add finely chopped ginger, garlic, green chillies, onions and curry leaves and saut'e till onions become soft, transparent and reduces in quantity. Into this, add the minced beef along with pepper and salt (be careful while adding salt as the beef has already been cooked with a little salt) and saut'e till browned here and there. Make sure all the moisture evaporates, but be careful not to dry out the mixture too much. Check for salt at this time. Keep this mixture aside to cool down. Once cooled, add the mashed potato and combine well. Now, take small amounts of this mixture and shape it into whatever shape you want, dip in beaten egg, roll in breadcrumbs and shallow fry/deep fry or grill. Garnish with onion rings.

Notes: You can simply fry the cutlets just by dipping it in the egg batter and omit the breadcrumbs. It tastes good this way too.

You can use the same recipe for chicken cutlets too. I have not used garam masala for the above recipe, but you could add some while making chicken cutlets.

Source: My Mom

Monday, 19 September 2011

Cabbage Mezhukuperatti


Hope everything is going great with you. My refrigerator is stuffed with so many things. Oh no, no not stuffed with food, stuffed with a little food and a lot of veggies. I'm sure you are surprised but well for me this is an everyday issue. We only have space in the kitchen for a small refrigerator and so when the veggie tray gets packed I am forced to stack my veggies along with food in the food compartments :( And so I ultimately end up with a very cramped and constipated refrigerator!!! :)

I think cabbage is one vegetable where I use the most amount of onions compared to any other vegetable, be it 'thoran' or 'mezhukuperatti'. I wish I could explain why that happens except that I like it's taste best this way. I was quite happy after making this dish. It's not everyday that I make Cabbage Mezhukuperatti. (usually I make Cabbage Thoran) This recipe was given to me by my mom long time ago but somehow I never tried making it. When it comes to cabbage mezhukuperatti, the best way I like to have it is with rice, sambar/moru kachiyathu, red fish curry and cabbage mezhukuperatti.

For my friends who are reading this recipe and not into our way of eating, I assure you this dish is versatile. It can be eaten as a sabji for chapathis/rotis along with a simple dal.

With the success of this dish, this is definitely going to be a regular on our daily menu. Hope you enjoy it too. Have fun!

Ingredients

Cabbage - 1/2 of a medium cabbage
Big Onion - 1 to 1 1/2 (big)
Green chillies - 2 to 3 (adjust as per spice tolerance)
Garlic - 3 to 4 cloves
Salt - to taste
Pepper - 3/4 tsp
Ajinomoto - a pinch (optional)
Oil

Method

Heat oil in a wok and saut'e garlic, green chillies and onions till onions turn golden brown. When the onions have browned well add cabbage along with pepper and salt. Mix well. Add a splash of water into this mixture and cover and cook for about 2 minutes on a high flame and another 2 minutes on low flame. Finally, add a pinch of ajinomoto and combine well till all the moisture disappears.

Source: My Mom

Sunday, 18 September 2011

Sweet Tomato Chutney


Hi everyone, I'm back :) Yup, its been almost a month since we met. I went to Kerala, my hometown for sometime and thoroughly enjoyed my stay there. I did get back a week ago but was busy settling down. However this gap wasn't planned, I was hoping to catch up with you in between, but it didn't work out. Anyways, now I'm back home and I was just waiting to sit in front of the computer and say hello to all of you.

I'm sure for a lot of you hailing from Kerala, you are still recovering from the joyous mood of Onam. A lot of things come to my mind when I think of Onam, the colourful Pookalams, the very entertaining Pulikali, of course a very dignified and benevolent Maveli (I particularly enjoyed the Maveli bit because my Dad used to dress up as Maveli every year for Onam celebrations at the apartment complex we stay in) and of course many other fun things, but for me my favourite part was the Onasadya. I just crave for a yummy spread of the traditional dishes laid out on the banana leaf during Onam. This time I was in Bangalore for Onam and was really really upset I couldn't eat a good sadya. But God was so good to me :) our neighbour who happens to be a malayalee too sent across some sumptuous "onam vibhavangal" and I thoroughly enjoyed it. We devoured and demolished it really quick.

Anyways, coming back to the recipe, this is one of those dishes which will take you right into Gujarat. The dish is extremely easy to prepare, takes just a few minutes and tastes awesome. This of course may not be an authentic recipe but it tastes really good made like this too. We are still on our very strict diet which is working quite well these days, Reju is very determined to lose weight and I'm inspired. This sweet chutney is a yummy treat that goes extremely well with rotis/chapathis and a simple sabji. The sourness of tomato soothed over by sweet jaggery/gud and with a hint of spice from the green chillies makes this dish delicious.

Give it a shot and let me know what you think. Enjoy!

Ingredients

Tomato - 1 (big)
Onion - 1 (medium)
Ginger - 1/2 inch piece
Green chilli - 1
Mustard seeds - 1/4 tsp
Salt - to taste
Jaggery/Gud (powdered) - 1 to 1 1/4 tbsp
Oil

Method

Heat oil in a wok and splutter mustard seeds. Add ginger, green chilli, and onions and saut'e till onions turn golden brown. Add finely chopped tomatoes along with salt and saut'e till tomatoes become soft and oil surfaces here and there. Switch off flame and add powdered jaggery into it and combine well.
Related Posts Plugin for WordPress, Blogger...