Showing posts with label Vegetarian Side Dish - Wet. Show all posts

Friday, 31 August 2012

Ripe Bananas and Coconut - "The Perfect Marriage" - Kuruku Kaalan


I realized something very amusing while I prepared Onasadya for the first time this year - Most of the dishes on the menu use similar ingredients and cooking methods and yet are unique in flavour and appearance! It’s amazing how slight alterations in the same ingredients can bring about such huge differences in flavors.

Kaalan is another proud entry, lined up in a Sadya, and again depending on regional differences, the consistency and ingredients of this dish vary from one place to the other. This dish is not just an integral part of the Kerala Sadya but can also be found in most Kerala homes as a dish consumed on a daily basis. The reason for the popularity of this dish is two-fold – Simplicity in preparation and it’s excellent shelf life. Kaalan can stay fresh for upto 2 weeks (I have heard that it’s flavors are enhanced as time passes) at room temperature if stored properly in good quality air-tight containers.


Though I wasn’t able to get this dish ready on the table during Onam, I tried my hand at it for the first time today. If I had known it was this simple, I definitely would have made it with the Sadya. :( That’s OK, there is always a next time! My mum prepares the most awesome Kaalan and I must say that my attempt at preparing it was quite good!

The slightly ripe bananas and the freshly grated coconut is a beautiful example of the celebration of cooking. This dish works amazingly well together and will definitely put you on top if prepared for family and friends. A sure winner, you guys HAVE to try this at home and it will leave you feeling blooming good. And so without further ado, I present to you the brilliant - Banana Kuruku Kaalan

Ingredients

Banana (1 and ¼ inch cubes) - 18 pieces (half ripe) (refer notes)
Green chillies (slit lengthwise) - 8 to 9 (adjust as per spice tolerance)
Curry leaves - 2 sprigs
Salt - to taste
Water - ½ cup
Curd/Yoghurt (sour; beaten) - 3 cups (make sure it's not too sour, but just enough)
Turmeric powder - ½ tsp
Chilli powder - ½ tsp
Coconut (grated) - 1 cup
Cumin seeds/Jeera - a pinch
Coconut oil - 4 tsp
Mustard seeds - ½ tsp
Fenugreek seeds/Uluva - 1/8 tsp
Red chillies (each slit into 2 pieces) - 3 to 4


Method

Cook together banana pieces, slit green chillies, a few curry leaves and salt in water. Cook till the banana pieces are soft.

Mix curd with a pinch of salt, turmeric and chilli powder. Pour this mixture over the banana pieces. Keep aside.

Grind grated coconut along with cumin seeds into a fine paste. Keep aside.

Heat the coconut oil in an earthen-ware pan (chatty) or any other pan that is available and splutter mustard seeds. Throw in the fenugreek seeds, curry leaves and red chillies and fry these ingredients in turn. (That is; add each ingredient one by one, frying for a few seconds. Be careful not to burn the ingredients)

Now add the ground coconut mixture to the above seasoning and saut'e on a low flame till raw smell disappears and the masala is roasted well. Remove from flame and leave to cool.

Once the roasted coconut-masala has cooled completely, add this to the prepared curd-banana mixture and stir till combined well. Place the earthen-ware pan with the Kaalan on a low flame and keep stirring carefully till the Kaalan reaches the desired consistency. (refer notes) Switch off flame and stir continuously till it becomes cold.


Store the Kaalan in a porcelain jar and use when required. (refer notes)

Notes:

1. If the bananas are not ripe enough, you can add a little powdered jaggery to the Kaalan for that required sweetness, towards the end. Do not add too much but just enough.

2. I don't like my Kaalan too thick and hence took it off the flame when the gravy was slightly loose. But for those of you who prefer a thick consistency, keep stirring the curry carefully till it thickens. Stirring the curry is very crucial because it prevents the curd/yoghurt from curdling.

3. The Kaalan can be stored in an airtight porcelain jar for a few days at room temperature (you can refrigerate it if you want to) and used when required.

Hope you all had a fantastic Onam. We had a lovely Onasadya at a small restaurant here in Bangalore, thoroughly enjoyed it. Special thanks to my lovely hubby, Reju for treating me with that yummy Sadya. He is totally amazed by my mighty love for the "Sadya"! But don't worry Reju, I still love you more!!! :)

Recipe Courtesy: The Family Cook Book by Mrs. K.M. Mathew

Tuesday, 28 August 2012

"Akale Onam Pularumpol..." - Varutharachu Sambar


An Onasadya is incomplete without the freshly prepared spicy Sambar. It gives the whole meal a definition and lifts the Sadya to a new dimension.


Sambar or Sambhar is a dish that holds origin and a very important place in South Indian cuisine. It refers to a vegetable stew or chowder based on a broth made with tamarind paste and split pigeon peas and tempered with coconut oil, mustard seeds, red chillies and curry leaves. Each state in South India prepares it with a typical variation, adapted to it’s taste and environment. The origins of this dish are uncertain, although legend has that it originated in the kitchen of Thanjavur Marathas ruler Shahuji, during the 18th century from the South Indian state of Tamil Nadu.


Sambar is reflective of a broad and ancient tradition of lentil-based vegetable stews in Southern India. Malayalees all over love this dish and prepare it in different ways. (differs from one region to another)

Nowadays, a ready-made spice mix for Sambar (Sambar powder) is easily available in all stores and super markets. But back in our ancestral homes, this spice mix was freshly ground and prepared and the wonderful aroma produced from these ancient kitchens was simply heavenly!

Sambar makes use of a wide variety of vegetables or vegetable combinations. Some of the veggies used are: Drumstick, Pearl Onion, Potato, Yellow Cucumber, Winter Melon/Ash Gourd, Pumpkin, Carrot, Okra/Ladies Finger/Vendakka, Elephant Yam/Chena, Raw Banana, Tindora/Kovakka, Beans, Brinjal/Eggplant, Snake Gourd, Radish etc…Sambar is an excellent curry option for kiddies who usually pick on veggies on their plates.

I have always had this crazy romance with Sambar ever since I was young. My mum used to prepare this very often at home and we always ended up having big bowls of this delicious curry even before we started off on the main meal. The complexity of texture and flavour makes the dish what it is.

Today I have for you, Varutharachu Sambar - Sambar prepared with roasted coconut and a mixture of freshly ground spices.


Ingredients

Split Pigeon Peas (toor dal) - 1/2 cup
Potato (cut into large cubes) - 2 (small)
Drumstick (cut into 2 inch pieces) - 1
Winter Melon/Kumbalanga (cut into medium sized cubes) - 2 cups
Carrot (cubed) - 2 (small)
Okra/Ladies Finger/Vendakka (cut into  1 and ½ inch pieces) – 5 to 6
Tomato (diced) - 1 (medium)
Tamarind – Size of a small lemon
Turmeric powder – ½ tsp
Green chillies (slit lengthwise) - 2
Pearl onions (whole or cut into half) – 12 to 15
Curry leaves - 1 sprig
Coriander leaves/Cilantro (finely chopped) – 1 tbsp
Salt - to taste

To Roast and Grind

Coconut (grated) - 1/2 cup
Coriander seeds – 3 to 4 tsp
Dry Red chillies – 4 to 5
Asafoetida/Hing/Kaayam powder - 1/4 tsp
Shallots/Pearl onions (finely sliced) - 2
Curry leaves - a few
Fenugreek seeds/Uluva - 1/4 tsp
Split Urad dal/Uzhunnu parippu - 1 tsp
Chana dal/Kadala parippu - 1 tsp
Coconut oil – ½ to 1 tsp (refer notes)


For Seasoning

Coconut oil – 2 to 3 tsp
Mustard seeds – ½ tsp
Shallots/Pearl onions (finely sliced) – 2 to 3 (optional)
Dry Red chillies – 2 to 3
Curry leaves - 1 sprig

Method

Soak tamarind in 1/4 cup of warm water and extract its juice. Keep aside.

Heat oil in a pan and add fenugreek seeds. Fry till lightly browned and add the split urad dal and chana dal. Fry until they turn golden brown. Now add the asafoetida and fry for a few seconds till aroma comes through. Transfer this to a bowl and leave to cool. In the same pan, fry the coriander seeds and dry red chillies. Saut’e till they give out a nice aroma and raw smell disappears. Throw in the slit pearl onions, curry leaves and grated coconut and fry till the coconut turns brown (take care not to burn the coconut). Keep aside to cool. Grind to a powder in a mixer. Add a little water and grind to a fine paste.

Cook the pigeon peas/toor dal along with diced tomatoes in a pressure cooker adding enough water. Cook for 1 whistle. Open the lid of the pressure cooker when pressure has fully escaped and mash the dal-tomato mixture. Toss in the veggies - potato, pearl onion, winter melon, carrot, drumstick (refer notes) with turmeric powder (1/4 tsp), enough water and salt. Pressure cook for upto 1 whistle.

Meanwhile saut’e the okra pieces in a little oil until their slime disappears. Remove lid of the pressure cooker and add tamarind extract/juice into it. Throw in the sautéed okra pieces and a few curry leaves. Bring to a boil. Give it a good stir. Add the ground coconut paste and rest of the turmeric powder. Check for salt and add if necessary. Adjust the gravy according to your desired consistency. Cook for 6 to 7 minutes on a gentle simmer. Switch off flame.


Preparation of Seasoning

Heat coconut oil in a small pan and splutter mustard seeds. Add finely sliced pearl onions and fry till light brown. (if you are using them) Add the dry red chillies and curry leaves and fry for a few seconds. Pour over the prepared sambar. Garnish with chopped coriander leaves. Keep covered for at least 20 to 25 minutes before serving. Serve hot with rice and pappads.

Notes:

1. Coconut oil enhances the flavour of the curry and lifts it to a whole new level. For health benefits, I tend to use a lesser quantity of coconut oil in my cooking. I avoided using coconut oil while frying the spices and grated coconut for the ground mixture. I only added it while preparing the seasoning/tempering. Please feel free to add more if you like the flavor.

2. Don’t limit your use of veggies to those I have mentioned in the recipe. You can add whichever vegetables are available in your refrigerator.

"Ona Thappan Ezhunellum Nerathoru Thaalapoli..." - Sadya Parippu


With just one more day to go for Onam 2012, I can’t wait to eat the authentic Onam feast tomorrow at one of the restaurants in Bangalore. Crossing my fingers and toes for an awesome and sumptuous meal.


One of the most modest and humble entries on the Onasadya is the Parippu. Served with piping hot rice, a drop ghee and crisp pappads (pappadams), this dish is absolute bliss! It is one of the simplest dishes on the menu and it definitely helps adjust the palate to accommodate the following “explosion of flavors” from the myriad of dishes served on the banana leaf. Keralites generally prepare Parippu in different ways, sometimes with an onion-tomato base or a mixture of ground coconut or a touch of freshly squeezed coconut milk.


However when it comes to a Sadya, this dish is dressed up in it’s simplest form. Cooked with a hint of green chillies and ginger and seasoned with aromatic coconut oil and curry leaves, the Parippu is “Simplicity at it’s best”. Like any Sadya, this dish too has a variety of ways in which it can be cooked depending on each region and can be cooked with either Green Gram Lentils (moong dal) or Split Pigeon Pea (toor dal).

I don’t think I can ever imagine a Sadya without kickstarting it off with this yummy and nutritious dish.


Ingredients

Split Pigeon Pea (toor Dal) – ½ cup (refer notes)
Shallots/Pearl onions (finely sliced) – 6 to 7 (refer notes)
Garlic (finely chopped) – 2 cloves (refer notes)
Ginger (finely chopped) – 1 piece (small)
Green chillies (slit lengthwise) – 2
Water (just enough to immerse the dal) (refer notes)
Coconut oil/ghee – ½ to ¾ tbsp (refer notes)
Curry leaves – 1 to 2 sprigs

Method

Pressure cook the split pigeon pea/toor dal along with the pearl onions, garlic, ginger, green chillies, a few curry leaves, a pinch of salt and water for 1 or 2 whistles. (adjust cooking time according to your pressure cooker) Open the lid of the pressure cooker after 3 to 4 minutes. Mash the dal lightly. Check for salt and adjust accordingly. Pour in fresh coconut oil/ghee and crushed curry leaves. (crushed between your palms to enhance flavour) Cover and keep aside for 15 to 20 minutes. Serve hot with rice, a drop of flavourful ghee and crispy pappadams.


Notes:

1. I used split pigeon peas to cook this dish. These lentils don’t need too much water to cook. You can also use green gram lentils (moong dal) to prepare this dish. If you are using green gram lentils, make sure you add atleast 1 and ½ cups of water for ½ cup of the lentils to make sure the lentils are cooked well and ensure the right consistency.

2. When you are preparing the Parippu for Sadya, you can avoid the use of garlic and pearl onions. Of course, adding it will do no harm!

3. You can add either fresh coconut oil or ghee at the end. But I prefer the use of coconut oil because the dish is served with ghee anyway.

4. This dish has a semi-thick consistency. So make sure you adjust the gravy consistency accordingly.

5. To make it healthier, you can add winter melon or ash gourd or yellow cucumber cubes (1 big piece of any 1 of the veggies)  to the cooked dal and cook it for another 2 whistles or till veggie is cooked. For an authentic Onasadya, this is not added.

I hope you enjoyed the recipe. I’m sure you now understand why I said this dish is definitely “Simplicity at it’s best”. Enjoy!

Sunday, 26 August 2012

"Uthrada Poonilave Va" - Olan


To be a vegetarian in India is very easy, not the least because of the variety of veggies and greens you find here. South Indian cooking is quite partial to the use of fruits of the earth, having endured centuries of the caste system, where, vegetarian Brahmins, occupied the pride of place atop.


Nostalgia definitely hit me while I prepared this yummy dish to go with my special Onam spread as my loving mom prepared this quite often back home and I wanted to go back to the comfort of my mom’s wonderful cooking. And thus I turned to this simple but deeply satisfying traditional stew made with yellow cucumber. It’s a mild stew, that is tamely spiced with green chillies and has very fresh flavors incorporated into it allowing the flavour of the vegetable to come through.

So over to today’s dish: The Olan.


Olan is yet another inevitable dish on the traditional Sadya menu. This dish is very subtle in flavour and avoids the use of any spices or masala. The mildly sweet coconut milk, crushed curry leaves and aromatic coconut oil gives this dish a spectacular clean fresh flavour. It’s unique taste and aroma makes an Onam Sadya complete. Veggies like pumpkin, yard long beans/Achinga Payar, Winter Melon, Ash Gourd and Yellow Cucumber are commonly used in this recipe. Today I have prepared Olan with yellow cucumber. Here goes the recipe.

Ingredients

Yellow Cucumber/Vellarikka (peeled and cubed evenly) - 250 gms
Red Cow Peas/Black-Eyed Beans/Vanpayar - 1/4 cup
Green chillies (slit lengthwise) - 2 to 3
Coconut milk (semi-thick) - 1 cup
Coconut milk (thick) - 1/4 cup
Salt - to taste
Curry leaves - 1 to 2 sprigs
Coconut oil - 2 tsp (refer notes)


Method

Soak the beans in water for 10 to 15 minutes. (optional) Drain and pressure cook this along with enough salt and water. (refer notes) Cook till done. (3 to 5 whistles approximately) Drain (if there is any excess water) and keep aside.

Cook the yellow cucumber cubes (refer notes) with green chillies, salt, adequate water, (about 1/2 cup) and curry leaves.

Once the cucumber cubes are cooked, (be careful not to overcook them, it should hold it's shape) add the cooked beans along with the semi-thick coconut milk. Mix well and bring to a boil. Adjust gravy to get the right consistency. Make sure the Olan is not too watery. Now pour in the thick coconut milk, crushed curry leaves (crushed between your palms to release more flavor), coconut oil and remove from heat. Mix well and cover with lid for 15 minutes. (this helps to incorporate flavors better) Serve hot/warm with rice. It was yummy. Ah! Bliss!


Notes:

1. I did not add too much coconut oil. Feel free to adjust the quantity of oil used. The more the tastier.

2. It is not necessary to soak the Red Cow peas before cooking it. You can directly pressure cook it. The cooking time differs from one pressure cooker to another. Also, be sure to add more water while cooking it because the beans doubles in size once cooked.

3. Make sure the yellow cucumber is cut into evenly sized cubes to ensure proper cooking.

We had this as a side to our Onam Sadya. You can always include this as a dish in your daily meal. It works really well with the right food combinations.

Thanks very much to all my readers for your appreciation.

Thursday, 23 August 2012

"Thithai Thaka Thaitho" - Bitter Gourd/Paavakka Theeyal


I'm sure most of you have already started preparations for a grand Onasadya and the celebration as a whole. Mums must be busy-bees entertaining the little kiddos at home who are having an absolute bash with Onam holidays going on. Well for us in Bangalore, the home-made Onasadya session is already over and I can't wait to eat an authentic yummy Sadya made by a professional Sadya caterer. I don't think I have ever missed an Onasadya till now. I am always excited when I have to go for an Onam meal because to me that is one of the tastiest meals you can ever get.

Though I did say I cooked up an Onasadya, I must admit I did not prepare all the dishes you will find in an authentic spread. It was more a mini Sadya than a grand Onasadya! I still have more to go and hopefully will add more dishes to the Sadya list in the coming months. I also had a great time with cousins over the weekend and together we enjoyed a second round of Sadya. The greatest part about cooking food is sharing it with the people you love and the smile on their faces after they have finished the meal is so worth it! A special thank you to my awesome hubby, Reju (who also helped me organize this spread) and lovely cousins Naveen, Tania, Shon and Lisha who so politely devoured the whole meal. I was so thrilled to see the huge green banana leaves licked perfectly clean!


Today I decided to share with you the next Sadya side-dish that I prepared, the Paavakka Theeyal. Theeyal is yet another typical Kerala dish made with roasted coconut. It can be prepared with a host of vegetables like pearl onions, eggplant, yam, drumstick, snake gourd, long beans, raw cashew, bitter gourd and many others. And today I have for you, Bitter Gourd Theeyal/Paavakka Theeyal.

Bitter gourd cooked in a delicious tangy and roasted coconutty sauce is sure to be a great hit and is an absolute die-for. Do add this to your Sadya menu and you will not regret it for sure.

Ingredients

Bitter gourd/Paavakka (finely sliced) - 2 (medium)
Pearl onions/kunjulli (finely sliced) - ¼ to ½ cup
Coconut (grated) - 1 and ½ cups to 2 cups (refer notes)
Chilly powder - 2 tsp 
Coriander powder - 2 to 3 tsp
Turmeric powder - ½ tsp
Fenugreek powder - ½ tsp
Green chillies (slit lengthwise) - 3 to 4
Curry leaves - 1 to 2 sprigs
Tamarind - size of a lemon
Salt - to taste 
Coconut oil - as required

For the Seasoning

Coconut oil - 1 and ½ tsp
Mustard seeds - ¼ tsp
Curry leaves - a few
Dry Red chillies – 2


Method

Soak tamarind in 1/4 cup of lukewarm water. Extract its juice and set aside.

Fry the grated coconut in a pan till it becomes golden brown (be careful not to burn it), stirring continuously at medium heat. Lower the heat and add the spice powders – chilli, coriander, turmeric and fenugreek powders and stir for a few seconds. Make sure not to burn them as this will result in bitterness and loss of flavour. Leave to cool. Grind to a very fine paste without adding water. (if it’s really difficult to grind, you can add a little bit of the tamarind extract) Keep aside.

Heat oil in a pan and add the sliced bitter gourd, pearl onions, green chillies and few curry leaves and saut’e (on a medium flame) until the bitter gourd is half done or until raw taste disappears. Add the tamarind extract, enough water (just to cover the bitter gourd pieces) and salt. Bring to a boil. Once it starts boiling add the ground coconut paste and mix till combined well. Lower the heat and cook until the bitter gourd is fully done and the gravy thickens.


Preparation of Seasoning

In a small pan, heat coconut oil and splutter mustard seeds. Throw in the dry red chillies and curry leaves and fry for a few seconds. (make sure you don’t burn any of the ingredients) Pour this mixture over the curry. Combine well. Cover with lid and set aside for 15 minutes. Serve hot with rice.

Notes:

1. You can always adjust the quantity of coconut used. But remember coconut enhances the flavor of the dish.

2. Bitter gourd can be replaced with any of the following veggies: Eggplant/Vazhuthananga, Snake Gourd/Padavalanga, Pearl Onions/Kunjulli, Drumstick/Muringakka, Elephant Yam/Chena etc…

3. If you are preparing snake gourd, drumstick or elephant yam theeyal, you don’t need to saut’e these veggies in oil. Just cook the pieces in enough water, sliced pearl onions, turmeric powder, salt, tamarind extract, curry leaves etc… and add the ground coconut paste. When done, pour the seasoning over the curry.

4. You can avoid pearl onions if you are preparing it for Sadya. (I added it because I love the flavor of pearl onions)

Tuesday, 21 August 2012

"Poove Poli Poove" - The Aviyal


Onam also known as Vamana Jayanthi is a Hindu festival and the state festival of Kerala celebrated by the people of Kerala. The festival commemorates the Vamana avatar of Vishnu and the subsequent homecoming of the legendary emperor Mahabali. It falls during the Malayalam month of Chingam (August-September) and lasts for 10 long days. Onam brings out the best of Kerala culture and tradition. Intricately decorated Pookalam, sumptuous Onasadya, breathtaking Snake Boat Race, and the exotic and graceful Kaikottikali dance are some of the most remarkable features of Onam - the harvest festival of Kerala.

The beauty of the festival lies in it's secular fabric. People of all religions, castes and communities celebrate the festival with equal joy and verve. This beautiful festival also helps to create an atmosphere of peace and brotherhood by way of various team sports and other events organized on the day.

I grew up in an apartment complex (where my parents continue to stay) where we celebrated almost all festivals. And Onam was one of our favorites. I still remember very fondly the late nights with all the aunties and friends at the apartment, very busy at work preparing a beautiful and colorful floral carpet. (Pookalam) One of the most marvelous facets of Onam is the unfolding of its rich and well-established culture. We see not just glimpses but a whole gamut of it in the ten-day-long carnival. Pulikali, Kaikottikali, Kummattikalli, Kathakali, Thumbi Thullal besides several other folk arts and traditions can be seen on one platform called Onam.

Personally for me, the Onasadya is the highlight of the festival, the most delicious part of the grand festival called Onam. It is considered to be the most elaborate and grand meal prepared by any civilisation or cultures in the world. It's a feast which if enjoyed once is relished for years. Onasadya is prepared on the last day of Onam, called Thiruvonam. Legend goes that Mahabali who was so attached to his people requested Gods to allow him to visit Kerala every year. People of Kerala wish to convey that they are enjoying the same age of prosperity as was witnessed during the reign of King Mahabali by preparing a grand Onasadya. Rich and the poor, everybody prepares Onasadya in a grand fashion as people of Kerala are extremely devotional and passionate when it comes to the sadya. So much so that, it has lead to saying, 'Kaanam Vittum Onam Unnanam', which means - men go to the extent of selling all their possessions for one Onam Sadya.

The Meal

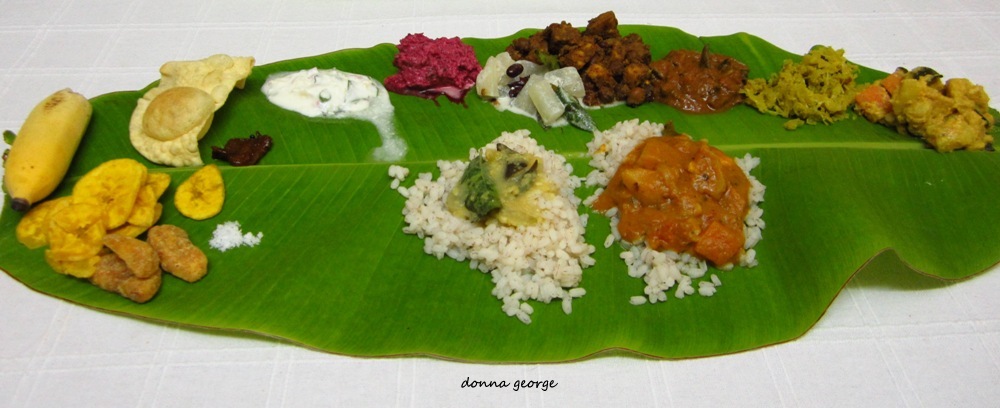
Rice is the essential ingredient of this Nine Course Strictly Vegetarian Meal. All together there are 11 essential dishes which are prepared for an Onasadya. Number of dishes may at times also go upto 13. Onasadya is so elaborate a meal that it is called meals, even though it is consumed in one sitting. Onasadya is consumed with hands, there is no concept of spoon or fork here.

A traditional Onasadya comprises of different varieties of curries, Upperies –stir fried veggies, Pappadams/pappads, Uppilittathu - pickles of various kinds, Chammanthi - the chutney, Payasams and Prathamans or puddings of various descriptions. Fruits and digestives are also part of the meal.

The food has to be served on a tender Banana leaf, laid with the end to the left. The meal is traditionally served on a mat laid on the floor. A strict order of serving the dishes one after the other is obeyed. Besides, there are clear directions as to what will be served in which part of the banana leaf. (I haven't followed this method as I didn't know which dish went where!) These days Onadaya has toned down a little due to the urban and hectic living style. Earlier, Onasadya used to be even more elaborate. There were about 64 mandatory dishes - eight varieties each of the eight dishes! At that time three banana leaves were served one under the other to accommodate all the dishes. How exactly they were accommodated in the tummy is definitely food for thought!


Today, I have for you one of the most special dishes of the Onasadya (and my favourite dish), the Aviyal. Aviyal is a mixture of vegetables, coconut, souring agents such as raw mangoes, tamarind extract or curd, seasoned with coconut oil and curry leaves. It is an extremely healthy and nutritious dish since it contains a whole lot of vegetables. Veggies most commonly used in aviyal are raw green plantain/ethakka, elephant yam/chena, cucumber/vellarikka, winter melon/ash gourd/kumbalanga and drumstick/muringakka. You can also use vegetables like achinga payar/yard long beans, carrot, tindora/kovakka, beans, brinjal, chembu, jack fruit seeds etc. You can use 4-5 vegetables among these but plantain and yam are the most important vegetables in this dish. This dish is easy to prepare but the vegetables need to be cooked to perfection, sourness just right and the grated coconut needs to be crushed/ground perfectly to get a delicious aviyal. The coconut oil and crushed curry leaves added at the end gives the dish a beautiful aroma and taste. The use of coconut oil and curry leaves cannot be compromised on.

So, here is today's Onam special vibhavam (dish), the Aviyal.


Ingredients

Vegetables - 3 cups (refer notes)
Chilli powder - 1 tsp
Green chillies (slit lengthwise) - 3 to 4
Turmeric powder - 1/2 tsp
Sour Yoghurt - 1/4 cup (refer notes)
Grated Coconut - 1 to 1/4 cup
Shallots/Pearl onions - 5 to 6
Cumin seeds - 1/2 to 3/4 tsp
Curry leaves - 2 to 3 sprigs (refer notes)
Coconut oil - 1 to 2 tbsp
Salt - to taste


Method

Cut the veggies into long thin slices. (preferably all the veggies should be of same size for easy cooking and a better visual appeal) Cover and cook the vegetables, curry leaves, chilli powder, turmeric powder and adequate salt in enough water. (refer notes) Be careful not to add too much water to avoid veggies getting overcooked. If overcooked, the aviyal will end up all mushy and watery.

Grind coconut along with shallots/pearl onions, green chillies, cumin seeds, a few curry leaves and 1 tbsp of yoghurt.

Add the ground mixture to the cooked veggies and mix till combined well. (be careful not to break the veggies) Cover and cook for a few minutes till the raw taste of coconut disappears. Add sour yoghurt and mix well. Check for salt and adjust at this time. Cook without lid till steam appears. (1 or 2 minutes approx.) Switch off flame. Add the fresh coconut oil and crushed curry leaves. (crush the curry leaves between your palms to release more flavour and fragrance) Cover with lid and keep aside for 15 to 20 minutes. Serve hot with rice.


Notes:

1. You can use any veggies you like. These are the vegetables I used: raw plantain, elephant yam (chena), winter melon/ash gourd/cucumber (kumblanga/vellarikka), drumstick, carrot, potato, beans. You can also use fresh farm veggies like colocasia/Taro/Arbi (chembu), brinjal etc...

2. You can also use raw mango instead of sour youghurt. Add sliced raw mango depending on the sourness. (about 1/2 to 1 whole mango) Raw mango slices should be added when the vegetables are half cooked. Once the mangoes go in, cover and cook till veggies are fully done.

3. Curry leaves and coconut oil are a very integral part of this dish. More the better.

4. Yam can be cooked separately if it involves more cooking time. You can pressure cook the yam slices with a pinch of chilli powder, turmeric powder and salt or just as it is. This cooked yam can be added to the rest of the cooked veggies just before adding the ground coconut mixture.

Friday, 30 March 2012

Palak/Saag Paneer - Curried Spinach with Indian Cottage Cheese


The weather is getting warmer. There is an occasional bird chirping and shrill sounds of squirrels on the trees. So now it's bye bye to the bulky blankets and woolies which have been stashed away and will see sight next winter. All this sudden warmth and chirpiness coaxes me to brighten my cooking!

So, today's recipe is adapted from the world famous Punjabi cuisine and this will surely brighten your day. Rich in flavours this cuisine is a delight. Tandoori Chicken, Chicken Tikka, Chole-Batura, Dal Makhani, Kebabs, Makki Di Roti and Sarson Ka Saag to name a few are the popular ones. Milk and milk products are an important part of their cuisine and Palak Paneer is no exception. I love this recipe especially for it's simplicity, unlike most other paneer recipes.


Paneer smothered in a thick but fresh leafy gravy is now a household name. The dash of spices smoothly blends with the saag to make an aromatic dish and yet flavours subtle enough to gently tease your palate. Paired with rice or rotis, they are a great party treat.


This was my first attempt at making my all time favourite Indian dish. I love the great combination of the spinach and the spices. The recipe is rather simple and we loved it. And I strongly believe that when Indian food is cooked properly it is the healthiest of cuisines in the world. I like spices but I also like to let flavours of each vegetable take the main role in the dish. So you can see here that the spices and aromatics have taken a step back not taking away the attention from the spinach. Though the spices are limited here, but it still has a strong aroma of all the Indian flavours.

So, as I sit here basking in the warm Bangalore sun, I hope you will enjoy this paneer dish with the dash of fresh colours.

Ingredients

Paneer - 200 gms
Spinach/Palak - 2 large bunches
Big Onion (finely chopped) - 2 (medium)
Tomatoes (finely chopped) - 2 (small)
Cumin seeds - 1/2 tsp
Coriander powder - 1/2 tsp
Garlic (finely chopped) – 6 to 7 cloves
Ginger (finely chopped) - 1 small piece
Green chillies - 2 to 3 (adjust as per spice tolerance)
Turmeric powder - 1/4 tsp
Cracked pepper - 1/4 tsp
Fresh Cream - 4 tbsp (optional)
Salt - to taste
Ghee/Clarified Butter or Oil


Method

Remove stems and wash the spinach thoroughly under running water. Blanch in salted boiling water for 2 minutes. Drain and toss into chilled or cold water. (this helps to stop the cooking process and retain the fresh colour of the green leaves) Squeeze out the excess water and keep aside. Roughly chop the green chillies. Blend the spinach along with green chillies to a smooth consistency. Keep this mixture aside.

Dice paneer into 1 inch cubes. Heat oil in a non-stick pan and shallow fry the paneer cubes till they start turning slight golden brown. Toss the fried paneer cubes into cold water. After a few minutes, drain and keep aside. (this process removes excess oil and helps the paneer to remain soft)


Heat ghee in a pan and splutter cumin seeds. Add the finely chopped onions and saut'e till it turns golden brown. Toss in the chopped garlic, ginger and coriander powder and fry tell raw smell disappears. To this, add the chopped tomatoes and salt and stir till it turns soft and oil floats. Pour in the spinach puree and combine well. Add cracked pepper and check for salt at this stage. Add a little water if necessary and when the gravy comes to a boil, throw in the paneer cubes and stir well. Cover and cook for 5 minutes on low heat. Finally, add fresh cream and a small blop of butter on top of the curry before serving.

Serve hot with rotis, chapathis, pulav or just simple plain rice.

Wednesday, 28 March 2012

Awesome Aubergine - Sautéed Aubergine in Tamarind Paste


Happy Wednesday peeps!!!

Apologies for having been missing for a loooong time here.... Wait! No, I am not sorry! :) I have just been having a ton of spontaneous fun this past few weeks to have much spare time.

So what have I been upto? Awesome fun at my cousin's engagement, fun and happy dinners and get togethers with family filled with much laughter and happiness. And now back to a quiet week with my hubby, my best friend. :) There... my excuse is all laid out... You do agree with me right!? Well, that's my story and I'm sticking to it! :D

I know many of us think that Indian cooking can be time consuming, difficult and such. And yes, I agree. But the key to any kind of cooking, is to create your own shortcuts and make yummy food, even if it means making use of pardonable cheap tricks! However, when I moved away from home and took on my life on my own, I found cooking other types of cuisine was simpler, easier, quicker and just different.


Should I tell you a little secret? When I left home, my mum was petrified that I might starve to death. I could not cook, you see. That is the honest truth. I was rather spoilt at home and never did much. I never took a keen interest in cooking. (even after repeated attempts by my mum to train me) I was more interested in work and doing stuff with my friends. And when I left home after marriage, my mom was tensed about what I would cook for my poor hubby. And yes, I did take time but hey mom, look at me now! No seriously, my mum is totally amazed that that same girl cooks, blogs about food and photographs food. How wild is that?

Anyway, coming back to today's recipe, today's dish is "simplicity at it's best" personified! A simple Indian dish, I have made this before but didn't get enough time to take pictures and blog about it. This is Amma's (my hubby's mum) recipe and as is always with her recipes, this is one heck of an easy recipe too! :) I figured this would be a perfect dish this lent season. With Easter coming up, all I can think of is loads and loads of yummy and sumptuous goodies laid out on the table. But to savour all these yum delicacies, we definitely need a light stomach and thus thought some light veggie delights would do the trick. Like I said, I have tried out this recipe before and I must tell you how much we loved it and I would recommend this to anyone I know.


So I'll leave you with this super simple and abundantly flavourful dish that is perfect as a side for rotis/chapathis or plain rice. Makes an elegant dish for this lent season. The flavour comes from the tangy tamarind juice or paste which leaves your tastebuds tingling and wanting more. Enjoy.

Ingredients

Aubergine/Eggplant (green) - 6 to 8
Big Onion (finely sliced) - 2 (big)
Tomato (diced) - 2 (big)
Tamarind (soaked in water) - size of a small lemon
Red Chilli powder - 1 to 2 tsp (adjust as per spice tolerance)
Turmeric powder - 1/2 tsp
Coriander leaves (finely chopped)
Jaggery/Gud (powdered) - 1/2 to 1 tsp (adjust as per taste) [refer notes]
Salt - to taste
Oil


Method

Slice each aubergine into 4 and then dice it into medium sized chunks. Keep aside. Once tamarind has soaked for a few hours in water, squeeze out the essence, strain and keep the juice or paste aside.

Heat oil in a pan and shallow fry the diced aubergines for a few minutes. Fry till the aubergines wilt a little or is soft and cooked till 1/4 done. (refer notes) Once done, remove from pan and keep aside.


Into the same pan, add some more oil  and add finely sliced onions and saut'e until it turns translucent and has reduced. Into this add the shallow fried aubergine pieces and combine well. Now add the diced tomatoes along with salt and mix well. Add a little water into the pan and cover and cook till tomato turns soft and oil floats. (approx. 5 minutes) Now throw in the chilli and turmeric powders and toss well. Add more water and continue to cover and cook on low heat till the aubergine is cooked through. Once the aubergine is cooked well, remove the lid and add the tamarind juice or paste into it and combine well. (add tamarind paste/juice little by little and check for sourness to get the right balance of flavours) Cook without lid till the gravy has reduced and has a semi-thick consistency. Add powdered jaggery at this time and mix well. Garnish with chopped coriander leaves.

Notes:

1. In case, you do not have jaggery available in your pantry, don't panic, you can always sugar.

2. Frying the aubergines helps add to the texture of the dish. You can avoid this step if needed.

Source: Amma

Wednesday, 11 January 2012

Lasooni Dal Palak - Garlicky Lentils with Spinach


Dal curry always awakens fond memories from my childhood days. Any form of dal always remain my favourite and my mum was always an expert at her beautifully cooked lentils. Spinach dal or dal palak was one of her specialities, and as children we used to slurp it all up.

Dal, in most Indian cuisines, is a side dish that goes both with rice and roti. As most dishes, it is cooked differently from state to state. However, it is a must-have in a "Thali". My mouth waters whenever I think of a good lunch thali from my favourite vegetarian restaurant. I particularly like this form of dal because it uses very less oil and thus is a great dish for all those weight watchers out there!


This simple dal palak is lip-smacking good. It was my first attempt at making the curry and I have to say, it was Yum! Light, delectable, easy dish, I should say. The aroma from the garlic and the fresh green colours of the spinach makes this an absolutely irresistable dish. And for those of you who don't relish spinach, this is a great way to eat your greens. I read some recipes online and also watched a cookery show that showed similar recipes and I knew what I had to do. I have tried to recreate some of that magic with this dish myself and hope you will enjoy it too. Piping hot phulka rotis, some yummy lasooni dal palak and a cool cucumber raita, and there you have your wholesome meal!

The curry is so good, that if you are not careful, you will never get to eat it with rotis or rice because you would already have had it as soup. Mmm...!

Ingredients

Toor/Arhar Dal (washed & drained) - 3/4 cup
Fresh Spinach (washed & coarsely chopped) - 1 bunch
Garlic (finely chopped) - 1 tbsp
Big Onion (finely chopped) - 1 (medium size)
Tomato (finely chopped) - 1 (medium size)
Ginger (finely chopped) - 1/2 tsp
Green chillies (slit lengthwise) - 3
Cumin seeds (jeera) - 1/2 tbsp
Turmeric - 1/2 tsp
Red Chilli powder - 1 tsp
Ghee/Oil - 1 tbsp
Coriander leaves (finely chopped)
Salt - to taste


Method

Pressure cook the toor/arhar dal with 2 green chillies, 1/4 tsp turmeric powder and enough water till soft. Once cooked, mash and keep aside.

Heat ghee/oil in a pan and splutter cumin seeds. Once they start popping, add chopped garlic and ginger and remaining green chillies and saut'e till raw smell disappears. Once the raw smell disappears, add finely chopped onion and fry till golden brown. Add chilli powder and remaining turmeric powder and saut'e till raw smell goes away. Now add the chopped tomatoes and salt and saut'e till soft and oil separates. Add the coarsely chopped spinach and toss till it reduces in quantity. (a few minutes approx)

Now add the cooked lentils into the spinach mixture and mix well. Once it starts boiling, switch off flame and garnish with freshly chopped coriander leaves. Cover and keep aside for 10 minutes.

Serve hot with roti/chapathi/rice.
Related Posts Plugin for WordPress, Blogger...