Showing posts with label Chutneys and Dips. Show all posts

Saturday, 26 October 2013

Creamy Cabbage and Carrot Coleslaw


Oh today is a happy happy day. My best friend Gaya gave birth to a healthy baby boy. So excited and can't wait to hold the cute little bub in my arms. Rajiv and Gaya, a big hug to all of you and special kissies to the honey bunch. Today's post is dedicated to you guys. May your bundle of joy bring you lots and lots of happiness always.

Coming back to today’s post, a quick dinner is now the norm in most homes with both husband and wife working and busy through the day. And though I am a SAHM (Stay At Home Mom), mommy of a very active 11 month old, I always feel completely drained by the end of a day. I really think the role of a SAHM is highly underestimated! What do you think fellow mommies?


So talking about simple dinners, when it comes to making chapathis, I truly am a lazy bum! (though the real secret is my chapathis are lousy ....but ..... ssshhhh ...) So I make chapathis every other day and do exciting and easy meals on other days. Today's dinner was Crumb Coated Baked Chicken, Cabbage and Carrot Coleslaw and bread. Deliciousness!!!! Of course Garlic bread should have made it to the table, I didn't have the time or energy to do that. :( So we settled for bread.

I will be sharing the recipe for the Crumb Coated Baked Chicken soon, so watch out.

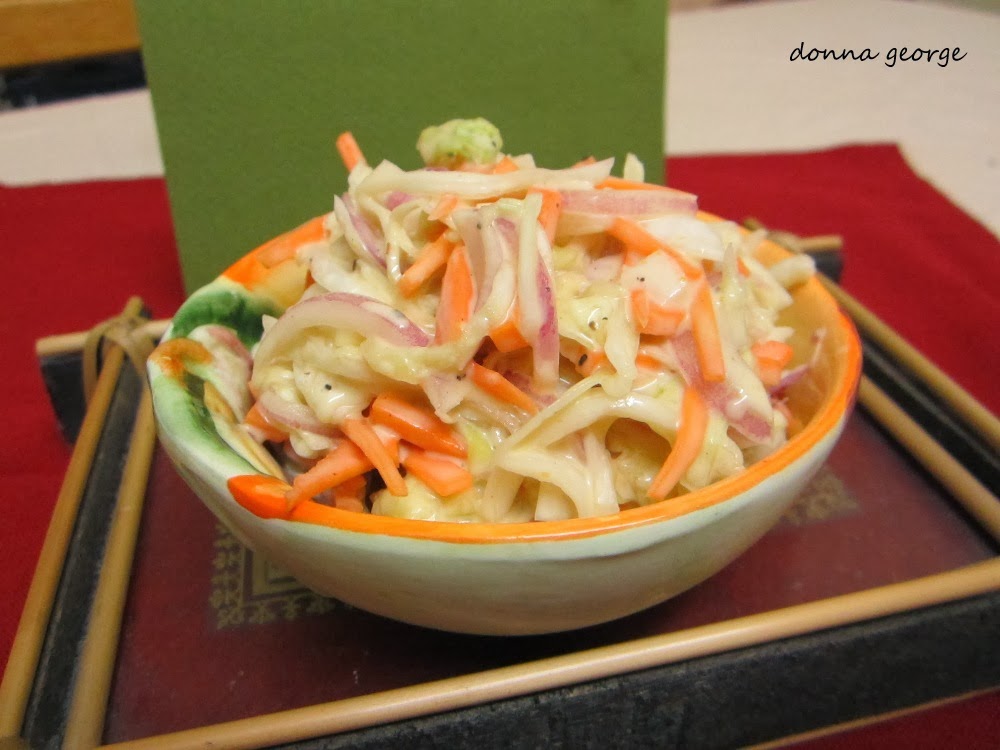
Today's recipe is the creamy coleslaw I made as a sidekick to the baked chicken.

Although this dish calls for simple ingredients, the final creation was incredibly sublime. This recipe for the ever popular coleslaw offers layers of flavor. The creamy mayonnaise clubbed with the sharpness of vinegar, good tasting mustard and sweetness of sugar provides a wonderful base for the dressing, which permeates through the entire salad. This is a sure hit with the kids if served interestingly.

Here are a few options (for kids and adults) : Coleslaw doesn't necessarily have to be eaten only with baked/fried chicken. Chuck a generous bit of slaw into your sandwiches, serve them as dips with your chips/fries/chicken nuggets, drop them into warm bread cups, or just stick your hands right into it, gobble as it is and of course don't forget to lick your fingers :)

Ingredients for the Coleslaw

Half a head of Cabbage (White, green or Purple or a mix of everything); shredded or thinly sliced
1 large Carrot; shredded or thinly sliced
1 medium size Big Onion; thinly sliced

Ingredients for the Dressing

1 & 1/2 to 2 tablespoon of Mayonnaise
1/2 teaspoon good quality Mustard
A dash of White Vinegar or Rice Vinegar
1 or 2 teaspoon granulated Sugar (optional)
Salt; to taste
Cracked Pepper; to taste


Method to prepare the Dressing

Take a large bowl and add the ingredients listed under "Ingredients for Dressing" into it. Add just enough water to get a runny dressing. Mix well.

Method to prepare the Coleslaw

Pour the dressing into the shredded veggies and toss till everything is combined well. Adjust seasoning if necessary. Place in the refrigerator till cold.

Serve chilled.

Enjoy!


Notes:

You can also make this coleslaw healthier by not adding any mayonnaise. For the non-mayo version:

Mix together vinegar, sugar, salt and pepper. Add the shredded veggies and toss till all the ingredients are combined well. Serve immediately.

Friday, 24 August 2012

"Poopattum Aarpuviliyumaayi Onam Varavaayi" - Beetroot Pachadi


Continuing with my Onasadya special series, I have yet another delectable treat for you.


Ever since I got pregnant, loads of people have been telling me to eat beetroot regularly because of all it's natural goodness and nutrition. As you all already know, I love any veggie in any form. But the beets; they trumped me! I have detested beets (I know that's a very strong word to use, bud sadly is true) since I was a wee little one. I don't like their colour (they look like they are bleeding!) or their taste, which to me is just isn't there. But last week, I tried my hand at Beetroot Pachadi and here came the evidence of transformation. I was amazed at how good these roots were that heretofore I could not palate suddenly became something I could nosh on!


Today's recipe is the Beetroot Pachadi. Pachadi, refers to a traditional South Indian side-dish. Broadly translated, it refers to food which has been pounded. The definition of the word pachadi is different among different South Indian regions. But in the states of Kerala and Tamil Nadu, pachadi is eaten fresh and typically made of finely chopped boiled veggies cooked with coconut, green or red chillies and tempered in oil with mustard seeds and curry leaves. Curd/yogurt based pachadi can be made of any vegetable, although beetroot, cucumbers, squash, mango, bitter gourd or pineapple are common. Pachadi is commonly eaten with rice and a lentil curry.

So, inspired by the Onasadya, I made this lovely Beetroot Pachadi. Beets being naturally steeped in sugar just bloomed in the cooking process. They were sweet and crunchy and they turn from blood red to a beautiful and magical pink colour when mixed with the yoghurt and coconut, which is so much more welcoming. Fresh beets clubbed with freshly grated coconut is just perfect and not in the least overpowering! A delicious accompaniment to go with your yummy Sadya.

Here is the recipe.

Ingredients

Beetroot (peeled & grated/chopped finely) - 1 (medium) (refer notes)
Green chillies (finely chopped) - 2
Yoghurt - 1/2 cup
Salt - to taste

For Grinding

Coconut (grated) - 1/2 cup
Cumin seeds - 1/4 tsp
Mustard seeds - 1/4 tsp

For Seasoning

Coconut oil - 1 to 2 tsp
Mustard seeds - 1/4 tsp
Dry Red chilli - 1 to 2
Curry leaves - 1 sprig


Method

Heat oil in a pan and add the grated/chopped beetroot, green chillies, adequate salt and a little water. (just enough to cook the beetroot) Cook until done. (cover and cook for a minute or two and then cook on an open flame) Keep aside. (do not throw away the excess water if any)

Grind the coconut along with cumin seeds to a fine paste adding a touch of water, if necessary, in a mixer. Once this paste is ground as desired, add the mustard seeds and give it a twist or two till it blends in. (you can either run the mixer while doing this or simply crush the mustard seeds using a mortar and pestle) Add this ground mixture to the cooked beetroot and place it back on the flame. Cook the beetroot-coconut mixture for a few minutes till raw smell disappears. Switch off flame and leave aside to cool. Once the mixture has cooled enough, add the yoghurt and mix till combined well. Check for salt and adjust if necessary.

Preparation of Seasoning

Heat coconut oil in pan and splutter mustard seeds. Throw in the dry red chillies and curry leaves and fry for a few seconds. (be careful not to burn any of the ingredients) Switch off flame and pour this seasoning over the prepared beetroot pachadi. Mix well and serve warm or at room temperature.

Notes:

1. You can grate or chop up the beets in the food processor. I followed this method because it makes it so simple.

Thursday, 9 February 2012

Tangy Roasted Bell Pepper Hummus


The weather has been pretty great lately and yesterday being a little warmer than most days. To blend in with the lovely weather we had ourselves a real cozy dinner. Besides the usual sabzi, chicken and rotis, I made fresh healthy hummus and roasted veggie and chicken sandwiches.

This was my first time at cooking and tasting hummus and I must say, I loved it. I'm sure many of you have tried and tested recipes for hummus. But today, I have for you my version of hummus made with roasted bell peppers. Hummus is a simple and healthy Arabic style dip.

I did go through a few recipes for guidance on how to make a basic hummus (which is so easy btw) and added my own twist just to add to the flavour. I chose fresh red bell peppers to complement the rich texture of the chickpeas.

Chickpeas, also known as garbanzo beans, I just realized are not very easy to photograph!


Actually they are rather boring to photograph. There is no zazzy colour nor do they have an interesting outer texture to them!

However they have a fantastic nutlike taste and are very versatile legumes. They are often found in many Indian and Middle Eastern dishes and can come in the form of falafels, in curries or as dips. While I picked chickpeas that are beige in colour (white kabuli chana), there are varieties that feature black, green, red and brown beans.

Above all chickpeas are fiber All Stars! They are rich in soluble and insoluble dietary fiber and can lower cholestrol.

You'll find more health benefits for chickpeas here.

Selecting and Storing
Chickpeas are available dried in packets or canned. When selecting dried chickpeas make sure that there are no signs of insect damage or moisture and that they are not cracked. You can store dried chickpeas in air tight containers in a cool, dark and dry place which will last for upto 12 months.

Bell Pepper
The roasted bell pepper in the hummus lends it's wonderful aroma and texture to the entire dip, making it wholesome and flavoursome. Bell peppers are not only an excellent source of carotenoids but also rich in vitamins, fiber and other nutrients. They are amazing antioxidants and recent research also suggests that intake of bell peppers can reduce risk for gastric cancer and esophageal cancer. This veggie can be used in a variety of ways, fresh crunchy salads, stuffed with lentils, chicken or other meats etc... to name a few.

Selecting and Storing
While buying bell peppers (be it red, yellow or green), if possible go for the fresh and bright colour because it is in these bright coloured peppers, you will find the true aroma and flavour. Make sure they are free from blemishes, bruises or colouring.

For short-term use, the best way to store bell peppers (to avoid getting rotten fast) is to refrigerate them in the produce drawer of your refrigerator. To ensure good air flow, remove peppers from any plastic bag or container they were purchased in. With proper refrigeration, a healthy bell pepper should last from three to five days in the refrigerator.

Store bell peppers for up to a month by freezing them. Frozen properly, bell peppers should retain good colour and flavour for a month. Wash, core and seed fresh bell peppers to get them ready for freezing. They can be frozen either whole or sliced.

Now over to the recipe.


Ingredients

Chickpeas/Garbanzo Beans (dried) - 1 cup
Red Bell Pepper - 1
Garlic (minced or crushed) - 2 cloves
Tahini paste – 2 to 4 tbsp
Fresh Lemon juice – juice from 2 lemons (adjust as per your taste)
Smoked Sweet Paprika (if available) or chilli powder - 1 tsp
Cumin seeds - 1 tsp
Olive Oil - 2 tbsp
Salt - to taste

For Marination

Olive oil – 2 tsp
Cracked pepper – a pinch
Salt – a pinch


Method

Peel and deseed the bell peppers and keep aside. Preheat the oven at 200°celsius. Make the marination mixture by adding olive oil, cracked pepper and salt in a small bowl and whisking well. On a greased baking tray, lay out the prepared bell pepper and pour the marination over the top. Allow to rest for 10 minutes. Cover baking tray with aluminium foil and place in oven and roast for about 20 minutes or till veggie is soft and coloured. (take off aluminium foil after 10 minutes in oven and continue to roast uncovered)

In a pan, dry roast the cumin seeds until they are fragrant. Take out and allow to cool. Powder and keep aside.

Blend or puree the chickpeas in a food processor along with roasted bell pepper, powdered cumin seeds, tahini paste, lemon juice, minced or crushed garlic, smoked sweet paprika or chilli powder and salt. Pulse until the mixture just comes together. With the processor running, slowly pour in the olive oil until incorporated and mixture becomes smooth. If you are using a blender, add all the ingredients along with olive oil into it and blend to a fine paste. If the paste is too thick use some of the reserved liquid from the cooked chickpeas. The consistency should not be liquidy and runny but thick and creamy.


Transfer the mixture to a bowl and drizzle with olive oil. (optional).

Serve with pita bread or pita chips and crudités (refer notes) for dipping.

Notes: Crudite's are raw and lightly blanched vegetables that are frequently served as an accompaniment to dips. A bountiful array crudités makes a colourful addition to a picnic, buffet table or cocktail party.

To prepare crudités, follow the procedure below:

Clean and trim the edges of veggies. (you can use asparagus, carrots, bell peppers, cauliflower, broccoli, celery, cucumber, green or yellow beans) Cut into slim sticks for dipping.

Blanching vegetables for crudités:

Some veggies benefit from a quick immersion in boiling water to soften their texture before serving them as crudités. These include asparagus, broccoli, cauliflower, and green or yellow beans.

Sunday, 18 September 2011

Sweet Tomato Chutney


Hi everyone, I'm back :) Yup, its been almost a month since we met. I went to Kerala, my hometown for sometime and thoroughly enjoyed my stay there. I did get back a week ago but was busy settling down. However this gap wasn't planned, I was hoping to catch up with you in between, but it didn't work out. Anyways, now I'm back home and I was just waiting to sit in front of the computer and say hello to all of you.

I'm sure for a lot of you hailing from Kerala, you are still recovering from the joyous mood of Onam. A lot of things come to my mind when I think of Onam, the colourful Pookalams, the very entertaining Pulikali, of course a very dignified and benevolent Maveli (I particularly enjoyed the Maveli bit because my Dad used to dress up as Maveli every year for Onam celebrations at the apartment complex we stay in) and of course many other fun things, but for me my favourite part was the Onasadya. I just crave for a yummy spread of the traditional dishes laid out on the banana leaf during Onam. This time I was in Bangalore for Onam and was really really upset I couldn't eat a good sadya. But God was so good to me :) our neighbour who happens to be a malayalee too sent across some sumptuous "onam vibhavangal" and I thoroughly enjoyed it. We devoured and demolished it really quick.

Anyways, coming back to the recipe, this is one of those dishes which will take you right into Gujarat. The dish is extremely easy to prepare, takes just a few minutes and tastes awesome. This of course may not be an authentic recipe but it tastes really good made like this too. We are still on our very strict diet which is working quite well these days, Reju is very determined to lose weight and I'm inspired. This sweet chutney is a yummy treat that goes extremely well with rotis/chapathis and a simple sabji. The sourness of tomato soothed over by sweet jaggery/gud and with a hint of spice from the green chillies makes this dish delicious.

Give it a shot and let me know what you think. Enjoy!

Ingredients

Tomato - 1 (big)
Onion - 1 (medium)
Ginger - 1/2 inch piece
Green chilli - 1
Mustard seeds - 1/4 tsp
Salt - to taste
Jaggery/Gud (powdered) - 1 to 1 1/4 tbsp
Oil

Method

Heat oil in a wok and splutter mustard seeds. Add ginger, green chilli, and onions and saut'e till onions turn golden brown. Add finely chopped tomatoes along with salt and saut'e till tomatoes become soft and oil surfaces here and there. Switch off flame and add powdered jaggery into it and combine well.
Related Posts Plugin for WordPress, Blogger...