Friday, 26 April 2013

Summertime Indulgence: South Indian Chicken Biriyani


Ah! Finally after several failed attempts at making the ever popular Biriyani, here is an excellent recipe for a delicious Chicken Biriyani. As I have mentioned earlier, Biriyani has been my all-time favorite dish; serve it to me any time of the day and I'm ever-ready to gobble it all up.

Biriyani is typically a special occasion dish, for many reasons. This dish is particularly known for its many layers of flavors that slowly develop and meld together. So, it’s a multi-step process that requires much love in many installments over a long cooking time. Also, those flavors and the aromas from the dish come from a blend of spices that are typically not used in everyday cooking and are pricier, hence adding to the special feel…

The concept of the Biriyani came from Persians. Originated in Persia it was brought to India by travelling Iranian merchants. It is a flavored rice dish made with alternating layers of rice and meat. The meat is cooked separately in a thick sauce/curry/gravy and then arranged between layers of rice and the whole assembly is then cooked very slowly to infuse flavors throughout the dish. When the Mughals conquered Northern India, they introduced much of their cuisine to the populace. As their rule spread further South, most Indians were exposed to the delicacy and it took a firm place in every Indian’s heart. And, then, every region of the country adopted the dish as its own and lent a distinctive flavor and taste to it by modifying the ingredients as also the method based on the indigenous cuisine.

Over time, a distinctive difference developed between the Biriyani as it is served in North India (that is only a slightly modified version of the Persian original) and that in the South, especially, Kerala and Tamil Nadu, which, has been significantly modified to suit the Southern Palate.

The good thing about the Biriyani is that the components can be made ahead and it tastes even better the next day as the flavors have more time to develop.


Spices have always been precious and festivals are occasions to indulge and splurge. Accordingly, food on these special days is enhanced in flavor, aroma and richness by various spices and ingredients indigenous to the country like cinnamon, cloves, cardamom and Basmati rice and those introduced through the ancient spice routes such as saffron, dried fruits and nuts.

Although, every family makes its own version, and I'm sure they are all yum, I share with you today my Amma's (my lovely mum-in-law) awesome recipe for the flavorful Chicken Biriyani. Amma's Biriyani always tastes lovely and she prepares it with all kinds of meat like Mutton, Beef etc... and all of them taste delicious. My search for a good Biriyani came to an end when I first had Amma's tasty Biriyani but it took me a lot of attempts to get it right! Thanks a ton Amma for so patiently teaching me this yummy dish.

Biriyani is an informal meal, typically eaten family style with the whole family gathered around a giant plate piled high with flavored rice and flavorful meat. That's a fantastic way to eat it, everyone digging in, laughing and enjoying the meal.
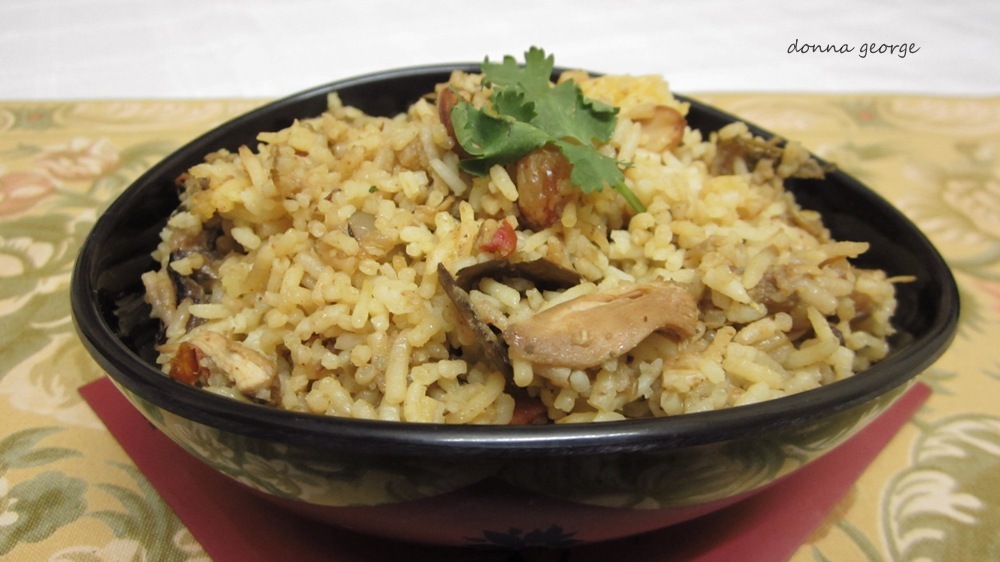
I served up my Biriyani with a chilled Raita - Crunchy Corn and Raisin Delight, Date and Lime Pickle and Pappads. This dish is quick and easy but at the same time elegant and bursts with flavors. I dedicate today's post to Amma, my loving mum-in-law. "Amma, I can't wait to make it for you when you come and stay with us in Bangalore" :)


Ingredients for Chicken

1 to 1 & 1/4 Kg Chicken or 14 to 15 pieces of Chicken; cut into pieces
6 to 7 medium size Big Onions; finely sliced
6 & 1/2 inch piece Ginger; ground to paste
17 to 18 cloves Garlic; ground to paste
8 to 10 Green Chillies; crushed (adjust as per spice tolerance)
4 to 5 medium size Tomatoes, finely sliced (refer notes)
4 to 5 tbsp Curd
10 to 12 Cashew nuts; ground to a fine paste with a little milk (optional)
1/2 cup Coriander leaves; finely chopped
1/4 cup Mint leaves; finely chopped or juice extracted
8 to 10 Cloves
4 to 5 Cinnamon sticks
6 pods Cardamom
2 to 3 petals of Star Anise
1 tsp Turmeric
Salt; to taste
Ghee/Oil (refer notes)

Ingredients for Rice

2 & 1/2 cups Basmati Rice; washed, cleaned and soaked in water for 1/2 an hour
5 cups Water
1 clove
1 inch piece of Cinnamon stick
3 pods of Cardamom
1 Bay leaf; coarsely crushed
1 petal of Star Anise
1/4 to 1/2 tsp Fennel seeds
A pinch of Turmeric
Salt; to taste
Ghee/Oil (refer notes)

Ingredients for Garnish

15 to 18 Cashew nuts
15 to 18 Golden Raisins
1 medium size Big Onion, finely sliced
Ghee; for frying


Method for the Chicken Curry

Grind all the spices - cloves, cinnamon stick, cardamom and star anise to a coarse or fine powder. Keep aside. This is the spice mix for the chicken curry/sauce/gravy.

Make light incisions on the chicken and keep aside.

Heat oil in a pressure cooker or a wok and add the finely sliced onions into it. Sauté till onions reduce in quantity. (do not let the onions turn brown) Remove the onions from the pressure cooker or wok and keep aside.

Into the same cooker, add ginger & garlic paste along with crushed green chillies and sauté till raw smell disappears. Throw in the ground spice mix and stir till raw smell goes away. At this time add the sliced tomatoes, enough salt and turmeric powder and sauté for a few minutes. (do not wait for the oil to float, just a few minutes of sautéing will do) Now toss in the sautéed big onions and combine well. Switch off the fire and add the curd, chicken pieces and finely chopped leaves into it. Cover and cook till chicken is cooked through. Reduce the gravy till it is a thick gravy consistency; residual gravy will be used later in the dish. Once done, add the cashew paste into it and (if you are using it) let the chicken rest for a while; about 1 hour should be perfect. (refer notes)

Method for the Rice

Drain the soaked rice and keep aside.

Heat ghee/oil in a pressure cooker and fry the spices - cinnamon, cloves, cardamom, bay leaf, star anise and fennel seeds) for a few minutes till the aroma comes through. Add the basmati rice and stir constantly on a medium flame for 5 minutes till rice turns glossy and starts crackling. (this helps to avoid the rice stick to each other) Now pour water, turmeric powder and enough salt and combine till everything is mixed well. (make sure you add enough salt but do not overdo it as the chicken has salt in it too) Close the pressure cooker (do not put weight) and wait for high steam to come. Once high steam appears, after a minute reduce the flame to low or sim and cook for exactly 5 minutes. Once done, switch off flame and open lid after 1/2 an hour. (Timing of cooking is crucial in this procedure of cooking rice, so make sure you follow the above mentioned timings to the to get the perfect consistency and texture of the Biriyani)

Separate the rice with a fork without pressing it too much. (refer notes) Keep aside.

Now take a large rice pot or any vessel and grease it with ghee/oil. Layer the rice and chicken mixture; begin with a layer of rice followed by chicken and repeat layers with rice as the final and top-most layer. (refer notes) Add drops of ghee between each layer. (on each layer of rice before arranging the chicken pieces) Place the rice pot or vessel on the fire and keep on gentle sim for a few minutes till the Biriyani is set well and gravy is incorporated well into the rice.

Method for Garnish

Heat ghee in a pan and fry onion, cashew and raisin and keep aside.

Garnish the Chicken Biriyani with fried onion, cashew and raisin. Cover the Biriyani pot after adding the garnish for a few minutes before serving.

Serve hot with fried pappads, dates chutney and a cool raita. And there you have it, awesome Chicken Biriyani…..


Notes:

1. In case you do not have tomatoes in your pantry you can add 1 ¼ cups curd instead.

2. You can either add ghee or oil to your Biriyani; of course, ghee brings out the authentic flavor of Biriyani. I use a mixture of ghee and oil so I don’t overdo both!

3. If you do not have the time to let the chicken rest, that’s fine, you can add it immediately into the basmati rice and continue cooking your Biriyani. But letting the chicken rest enhances the overall flavor of the dish.

4. I have cooked the rice in my own style of cooking basmati rice since I find this an extremely easy method. But you can choose your most convenient method of cooking the same.

Recipe Courtesy: My lovely mum-in-law, Amma

Wednesday, 17 April 2013

Treats: Home-made Chicken Nuggets


This Home-made Chicken Nuggets recipe was featured in Kids directory’s On-line publication: http://kidsdirectorybangalore.in/

If someone gave you a handbook to life and told you that everything you need to lead a happy, fulfilling life is in there and all you have to do is "apply" the printed wisdom; Would you take it? I would and I think you would too. Life is short, if you have the code, why not help yourself?! Food Lovers Chicken with delicious chicken recipes selected by Jonnie Leg´er; this is not just any cookbook but one that I would definitely appreciate as a cooking enthusiast. Almost all recipes in the book are for fine cooking and dining! As soon as the book arrived, I dived right into it and honestly, could not put it down. And, I have read it twice already! Their idea was to put together a book with nuggets of wisdom for the perfect execution from kitchen to table; from getting the right ingredients to prepping and cooking right to styling and plating with beautifully photographed food pictures. Food Lover's Chicken is aimed at the everyday cook wanting to improve, the seasoned expert looking to review the highest culinary standards and the food lover seeking a fascinating glimpse into the pursuit of epicurean excellence.

I love the way the book is written; the style and language concise and succinct.  And, the best part; it is perfectly sized!! In just about 394 pages, it packs in quite a bit of tasty dishes and know-how and it is small and light enough to be carried around in a handbag.

Now, that is my kind of reference text. This is one book that is going to be dog-eared much! And a big big Thank you to my beautiful and loving sis-in-law, Sumu (who lives in Adelaide, Australia with her lovely husband, Jacob and handsome little boys, Tarun and Tushar) for this precious gift. Sumuchech, this book came to me at a time when I was wondering when I will ever be able to blog again, yearning for some "me-time". Oh how thrilled I was to get this book Sumuchech and that day I was sure I was going to cook again, not just for family but for friends and loved ones and definitely sharing my recipes and stories in the kitchen on this blog. And so Sumuchech, this one's for you.....Thank you so much for encouraging me with this excellent book and helping me to move on and never give up.

Over to today's dish.... How many of us like yummy deep-fried goodies once in a while?! Atleast I do!

Over weekends, you will agree we all like to have some special food to enjoy family time.  Last weekend, when we called our cousins over for dinner, I decided to prepare home-made Chicken Nuggets (for the first time ever!) rather than buying frozen nuggets. I like experimenting with chicken because it beautifully absorbs a variety of flavors.

Chicken marinated with pepper-salt and crumb fried with a rich coating of bread crumbs is quite the snack to devour on a lazy Sunday. All those mommies with little kids who suddenly turn into cute brats when they see food and demand for fried foods like nuggets from the nearest McDonalds or KFC, here is a perfect dish for you to try at home. And don't have any regrets because they are definitely healthier than the ones you get from any hotel or cold-store.

This works extremely well as a starter or just simply something that you can munch on. I encourage everyone trying out this recipe to use their imagination and be a little creative. You really can't do anything wrong here. Reju ate one or two and said they were scrumptious. For the next time he said we should try them with some Indian/Oriental spices. No problem there!

So, if you are looking for something old but pepped up, something traditional with new flavors, then this is the perfect dish for you.

Hope you enjoy it. There are some recipes that at first sight seem just a bit ordinary or so you think when you look at the list of ingredients. It takes a second look to change that first impression. Because you realize the simplicity of the recipe has big taste attached to it.

For those of you who give this recipe a try will straight away realize that it is quick and easy to make and you will presumably replace those frozen nuggets you buy from the cold store. Nothing against store-bought nuggets, but why settle for frozen processed sticks, when you can enjoy a healthier and tastier chicken big on taste.

So here is how I cooked Chicken Nuggets.  Go ahead and feel free to try different ingredients to personalize it.

Ingredients

600 gms of Boneless Chicken breast; cut into bite-size pieces
Salt & freshly milled pepper
3 to 4 tbsp All-purpose flour
2 Eggs
2 cups Breadcrumbs; to coat
Any Refined Oil; for deep frying (refer notes)
Chili Sauce or Tomato Ketchup; to serve

Method

Season the chicken with salt and pepper and lightly coat them with flour. Keep aside.


Whisk the eggs in a large bowl. Place the breadcrumbs on a flat plate. Coat the chicken pieces with egg, then roll in the breadcrumbs and press down well.

Heat oil (enough for deep frying) in a wok and fry the chicken pieces for about 3 to 4 minutes or till the chicken is cooked through and turns a lovely golden brown. Drain on a paper towel.

Serve hot with chili sauce or tomato ketchup.

Notes:

1. The original recipe uses fat for frying the nuggets. But I really don't think that is necessary simply because it's not healthy. Any refined oil is perfect. (do not use pungent oils like mustard or sesame oils)

2. I also will try using the same recipe and baking these nuggets in the oven to make it a healthy snack. Will let you the verdict soon. And those of you who try it at home, try baking them in the oven for a few minutes, basting enough oil on both sides of the chicken pieces, flipping them in between till they turn a lovely golden brown. Do let me know how they turn out.

Lots of love :)

Recipe Edited on 4th February 2014:

I promised you all the baked version of the above recipe and here it is. I kept my word, guys. Here you go:

Ingredients

600 gms of boneless chicken breast; cut into bite-size pieces
Salt and freshly milled pepper
3 to 4 tablespoon all-purpose flour
2 eggs
2 cups breadcrumbs OR 1 cup breadcrumbs + 1 cup oats, to coat
1 teaspoon olive oil
Tomato Ketchup; to serve

Method

Begin by seasoning the chicken with salt and pepper and lightly coat them with flour. Keep them aside when done.

Next, whisk the eggs in a large bowl. Place the breadcrumbs on a flat plate. Coat the chicken pieces with egg, then roll in the breadcrumbs and press down well.

Arrange the chicken pieces on a greased baking tray, spacing them a little apart. Drizzle with a little olive oil on each piece of chicken, and bake at 190 C for 8 minutes on either side or till the chicken is cooked through and turns a lovely golden brown. (Halfway through the cooking, drizzle a little more oil on the pieces of chicken. This keeps the chicken moist)

Serve hot with tomato ketchup, a dip of your choice or just as it is.

Recipe Courtesy: Food Lovers Chicken

Tuesday, 16 April 2013

Spice it up: Tangy Chicken


And I'm Back!! :) Yes, after a good long break back home, I'm back to cooking and blogging. Oh how I missed this! In these past few months I realized how much I enjoy doing this.

But I have been doing well and happy to share the good news of the birth of our little bundle of joy, our new addition to our small family, our precious baby girl, Michelle. Life has changed so much after she has arrived, new schedules, altered sleep patterns, a whole new routine altogether; stressful, but definitely worth it I have to say especially when you see that innocent little smile :) I was at home all these months enjoying all the pampering and little Michelle had so many people around her all the time; she misses everyone tons.

But it feels great to be back in Bangalore, starting a new life with our little bubble. The last 2 weekends were hectic with all the unpacking and general settling down. Reju was awesome, worked from home for 2 weeks and just started going to work this morning. He was so helpful, did so much, poor thing. Thanks Reju, we love you too much. What would I have done without you?!


When all the settling down madness was over, I thought it's high time I got back to the world of blogging. Though it’s going to be a challenge with Michelle around, I sure am going to try posting recipes whenever I find time.

Gosh it's HOT in Bangalore and the frequent power cuts have been really really painful. Will surely try posting some refreshing cool recipes that will ease out the summer heat, soon.

We had a good time on Saturday with our cousins Asha, Santosh and their little munchkin, Nia. Dinner was simple and Asha brought in some lovely beef cooked with carrots and potatoes. Since I was craving to get in the kitchen and cook up something, I decided to go with this easy chicken recipe which was given to me by my Mommy, world's awesomest cook!!!! I love this dish for it's simplicity and it can be cooked in a jiffy. With a baby on board, we need to get things done really fast. And this dish definitely works well.

Today's recipe is a tasty chicken dish which is a convenient quick-fix when you have unexpected guests. The combination of the chicken, aromatics and ketchup makes this dish so soothing to the soul. On the weekends I enjoy taking time and preparing a good hearty meal. And very often I let my imagination take control and start playing with ingredients. And of course it had been sometime since I last made a full meal for guests and I was craving it. I had bought some fresh chicken and checked out what else my pantry would give (I have to really start getting through the stuff in there ... I can feed a small country with the contents!). Well I found a few things that I could use.

Today's post is very special to me. I dedicate it to my dearest Mom, (that explains the picture above) who has always been wonderful, sacrificing so much for her family. We love you mama, and we know that there is nothing that we can do to make up for all that you have done for us all these years. These past few months you were wonderful, you took care of Michelle and me so beautifully. And Dada, no we haven't forgotten you either, you were great too. Thanks cartloads for everything. And as I write this, I am emotional yet happy that we are blessed with such loving parents who are always there for us, come what may.

Can't wait to meet Dada and you this weekend. Love you loads. And Ma, thanks once again for yet another yummy recipe. We absolutely loved it.

And so hoping that the weather gets better soon, I leave you with this great recipe of shallow fried hot, spicy, gingery and garlicy chicken glazed in a yummy ketchup mix. Honestly, you will really find the flavors of these ingredients bursting into your mouth. The combination works well and that addition of ketchup rounds the entire dish up very well. I would recommend a simple rice dish like a Pulav/Jeera Rice or hot phulkas with this as anything else will take away the aroma and fragrance of the main dish. And we do not want to do this, do we?


So here we go….

Ingredients

10 to 12 pieces of Chicken; cut into medium or small pieces (refer notes)
1 Big Onion (small one) or 7 to 8 shallots/pearl onions; finely chopped (optional)
1 or 2 Green Chillies; slit lengthwise (adjust as per spice tolerance)
1/4 to 1/2 cup of Tomato Sauce & Hot & Sweet Sauce (all put together in equal quantities)
1 to 1 1/2 tsp of Paprika (you can use Kashmiri Mirch)
2 sprigs of Curry Leaves
Refined Oil

Ingredients for Marination

1/2 to 3/4 tbsp Ginger & Garlic paste
1 to 1 1/2 tbsp of Tandoori Masala (refer notes)
Salt - to taste

Method

Wash and clean the chicken pieces and pat dry with towel. Make small gashes on the pieces and marinate it with the ingredients listed under "Ingredients for Marination". Let it rest for atleast 1 hour at room temperature or overnight in the refrigerator.

Pressure cook the chicken pieces and keep aside.

Heat oil in a wok; throw in the slit green chillies and curry leaves. Saut'e for a few minutes. Throw in the chopped onions along with enough salt (add more paprika or Kashmiri mirch at this time if you like it spicy) and saut'e till light brown. (if using onions) Now add the cooked chicken pieces and toss for a few minutes. (2 to 3 minutes approx.) To this mixture, add the sauces, turn the flame to high and stir continuously till masala coats the chicken completely and the sauces dry up. Check for salt and adjust as desired.


Ta da ....your dish is ready. Wow! Ever heard of so many different flavors harmonizing so well together? My hubby, Reju was quite pleasantly surprised and almost literally licked his plate clean. I hope our cousins enjoyed the lovely combination of chicken, tandoori masala and ketchup! I was worried that it might have been too exotic for them. (I mean the combination of ingredients)

Notes:

1. Make sure the chicken is cut into small or medium sized pieces with light gashes or pricks on them so that the chicken is coated well with the gravy enhancing the flavor of the whole dish. My pieces were big, but small or medium is always better.

2. You can use any Tandoori Masala available in your local grocery store. I made my own. Here is how I prepared my very own (first attempt) Tandoori Masala:

Ingredients

2 tbsp Garam Masala
2 tbsp ground Cumin (since my ground cumin seemed very strong, I reduced it to 1 & 1/2 tbsp)
1 1/4 to 1 1/2tbsp coriander powder (if your powder is strong, add only 1 tbsp)
4 tsp Paprika (you can use Kashmiri Mirch)
2 tsp Kasuri Methi /Dried Fenugreek Leaves
1 tsp Turmeric powder
1/2 tsp Red Chilli powder ( I used a heaped 1 tsp because we like spice)

Method

Combine all the ingredients listed above using a spoon or blender and store it in an airtight container.

Notes: It stays fresh for 4 to 6 weeks.

Recipe Courtesy: My lovely mother.

Sunday, 9 September 2012

In the Kitchen with a Plate of Spicy Singapore Chicken Noodles


I have to tell you, I have an intense carnal love for noodles. Out of the blue, an image, of me twirling noodles with a fork (tried my hand at chopsticks but never mastered the art; though my mom is an expert at using these) pops into my mind and refuses to budge. There are times when I crave these thready, slurpy satisfaction so much I tend to display withdrawal symptoms if I don't get my fix!

My love began during my childhood in Kerala, when we would have yummy noodles prepared by my mum or at times eat out at a Chinese restaurant. (where they served more Indian-Chinese, I would say) I never ordered the fried rice, always the delicious Mixed Noodles which I would douse with the chilli vinegar and spicy sauce. I loved it and I pigged out. I was happy at the end of a huge bowl of those flat thready stuff! :)

To this day, a bowl of it makes me happy. When cravings hit, the easiest and quickest solution is, of course, instant noodles, of which, there is always a supply at home. (Reju’s favorite midnight meal when his tummy is full and yet shockingly hungry for absolutely no reason!) However, it isn't healthy or well… nourishing. And, that's where this yummy Singapore Chicken Noodles trumps everything. Easy to put together and just scrumptious, I may have just found a healthy way to feed my addiction! :-))


Today’s dish is so yummy that you wouldn’t want to put your forks down. A very spirited and flavourful noodle dish. I love the bold flavors and the fiery combination of noodles and curry powder. The flavors of pungent curry powder, salty notes from soy sauce and the heat from the chilli will explode in your mouth. There is nothing elegant about this dish, but there is everything downright scrumptious to it. It’s simply the best standby meal, ready in minutes with ingredients you are sure to have in your pantry.

I’d like to say a huge Hi! and welcome to everyone who’s visiting my little space for the first time. It’s great to have you all over and hope you’ll stay around for more. Maybe you’d like to get to know me better, or just browse through a few of my recipes, grab a cup of tea and enjoy. Hope you are ready to join me on my crazy roller coaster ride.

More fun news to come later, so stay tuned.

Ingredients

Egg Noodles - 1 pkt
Vegetable oil or Peanut oil (whichever is available) - 1 and ½ tbsp
Chicken Thigh fillets (trimmed and thinly sliced) - 500 to 600 gms (refer notes)
Vegetables - julienned (refer notes)
Big Onion (halved and thinly sliced) - 1 (medium)
Shallots (finely sliced) - 4 to 5
Green chillies (slit lengthwise) - 1 to 2 (adjust as per spice tolerance)
Ginger (finely sliced or chopped) - 1 small piece
Garlic (crushed) - 3 cloves
Spring onion - 2 to 3 sticks (leaves separated)
Curry powder - 1 tbsp (refer notes)
Chicken stock - 2 to 3 tbsp
Soy sauce - 1 to 2 tbsp
Brown Sugar - 1 tsp
Pepper (freshly ground) – ¼ tsp
Salt - to taste (if necessary)


Method

Cook the noodles as per instructions on the packet. Drain and keep aside. Cook the frozen peas in boiling water for a few minutes. Run under cold water to retain the fresh green colour and set aside.

Cook the chicken in the pressure cooker for upto 1 whistle. Switch off flame and open immediately. (refer notes) Cut the cooked chicken into thick strips. Keep aside.

Heat a wok over a high heat. Add a little oil and swirl to coat the wok. Add the chicken pieces and stir fry for 3 to 4 minutes till moisture has evaporated and chicken is cooked through. Transfer to a plate.

Into the same wok, pour in some more oil (if necessary) and add the green chillies, big onions, shallots, spring onion bulbs, garlic and ginger and sauté till onions soften. Throw in the bell peppers, carrots, peas and sprouts. Add the veggies one by one, according to the time it takes for it to cook. Make sure you cook each vegetable a little, like a couple of stirrings before you add the next. Once the veggies are done, add the soy sauce, sugar and cooked chicken into the wok and stir fry 2 minutes or until heated through. Now add the cooked noodles along with the curry powder and pepper and toss till combined well. Check for salt and add if necessary. (don’t overdo the salt because the curry powder and soy sauce may have enough) Gently toss or sauté the noodles to avoid noodles from breaking. Pour in the chicken stock and stir fry on high heat for a few minutes till moisture has evaporated completely and the noodles turn glossy. Add chopped spring onion leaves and toss. Switch off heat and serve hot.


Notes:

1. It is not necessary you use only chicken thigh fillets for this dish. Feel free to use any cut of chicken that is available in your refrigerator. If you are using chicken on the bone, make sure you remove all bones.

2. Veggies used in the dish are: Carrot - 1, Frozen Green Peas - 3/4 cup, Red or Green Pepper/Capsicum (seeded, deveined and thinly sliced) - 1, Bean Sprouts - 3/4 cup.

3. Curry powder is a blend of up to 20 different herbs and spices, including the commonly used: cardamom, chillies, cinnamon, cloves, coriander, cumin, fennel, fenugreek, mace, nutmeg, pepper, poppy seeds, sesame seeds, saffron, tamarind and turmeric. (which gives curry its characteristic golden color) In Indian cooking curry powder is freshly ground each day (making it far more flavorful and pungent than the mixes sold in the store) and comes in "standard" and "hot" versions.

Storage and Availability: Curry powder quickly loses its pungency. It will keep for 2 months in an airtight container. It is available all through the year in any supermarket.

4. You do not need to cook the chicken in a pressure cooker. You can always do it directly in the wok while sautéing the chicken pieces and toss till cooked through.

5. For best results, make sure you use good quality egg noodles.

Thursday, 6 September 2012

An Emotional High: Chicken 65 - Southern Style Fried Chicken


I had a quiet and lovely birthday yesterday which was well spent with Reju. It's such a blessing these days that workplaces have become so flexible that they can connect from anywhere in the world and still work! Awesome. So, Reju decided to work from home yesterday and I was overjoyed to have him around. We also had a yummy dinner at a restaurant called the "Four Seasons" quite close to home. We gobbled up some authentic Hyderabadi Dum Biriyani which is the restaurant's signature dish. It definitely was one of the best Mutton Biriyanis we ever had. I have to say a dish with a lot of finesse. Totally satisfied my love for Biriyani!

I was so overwhelmed by all the calls and text messages I received on my birthday, made me feel extremely special. Thanks a ton everyone.

I was watching "Love Bites With Joey", a new culinary show hosted by supermodel Joey Mathew who hails from Kerala. Though I don't really follow her show very regularly, I happened to stumble upon one of the episodes where she was cooking up a lovely Southern spread for family and friends. One particular dish caught my eye and that was Joey's version of Chicken 65 - Southern Style Fried Chicken.


Being a Foodie my element is Food and so do not ask how an irresistible dish like this can send me into day dreams of munching onto well roasted chicken. It just happens! Within a few seconds of watching the show, I had imagined what tonight's dinner would be. Thank you Joey.

This dish is simple and tasty - the type we will often enjoy on a weeknight, quick to prepare but full of flavor. The pressure cooker takes care of most of the cooking, where it is cooked with a variety of spices and aromatics and then roasted to bring out maximum aroma and flavor.

A good chicken dish once in a while is something I adore. Chicken is versatile, tastes wonderfully juicy if cooked to perfection and can be used in soups, salads or as a whole dish.

A medley of roasted chicken and spices aromatized with the ever flavorful coconut oil, to me it comes close to heaven! Of course this dish is very popular and there are so many different versions of it. This recipe however is slightly different from the ones I have tasted earlier and has a lovely rustic flavor attached.

Chicken cooked in it's own juices and roasted to perfection, it truly is Delicious!

Ingredients

Chicken (with bone; cut into large pieces) - 1 kg (refer notes)
Big onion - 1 (large)
Ginger - 1 medium size chunk
Garlic - 4 cloves
Salt and Pepper - to taste
Red Chilli powder - 1 tsp
Cumin powder - 1 tsp
Coriander powder - 1 tsp
Curd - 400 gms (refer notes)
Water - 2 tbsp
Coconut oil - just enough to shallow fry the chicken pieces (refer notes)


Method

Grind together onion, garlic and ginger in a blender into a fine paste. (refer notes) Keep aside.

Make a marinade base by mixing together the curd, ground onion mixture, red chilli powder, salt, cumin powder, coriander powder and pepper powder.

Make light gashes on the chicken pieces and soak them in the marinade for 20 to 30 minutes. (overnight marination is the best)

Take a pressure cooker with water (refer notes) and arrange the chicken pieces in it. Cover and pressure cook till the first whistle comes through. Remove from heat and let the chicken cook in the residual steam for a few minutes.

Open the lid of the pressure cooker and check if chicken is cooked. Reduce any gravy that is left in the cooker till the chicken is dry.

Heat oil in a pan. Arrange the semi-cooked chicken pieces on the pan and roast (refer notes) on medium to high heat till it browns evenly all over. Remember this is simple shallow frying and roasting and hence do not overdo the oil because this will make it too greasy and unappealing.

Notes:

1. You can use any cut of chicken and cut according to desired size. (breast, thigh, with bone etc...) I love using chicken on the bone because I think it is plump, tasty and juicy.

2. You can also use yoghurt instead of curd, whichever is available. If you are using yoghurt, lightly beat it before preparing the marinade.

3. You can use any refined oil also to fry up the chicken pieces. But of course like I always say, coconut oil enhances flavor. The quantity of coconut oil can be adjusted according to your liking. If you are using a good quality non-stick pan, you can use less oil and the frying would be just fine. For the very health conscious, grilling this moistly marinated chicken would be a good option.

4. If you find that your onion, garlic and ginger need a little moisture to initiate the grinding or blending process, add a little curd into it.

5. Water can be added into the pressure cooker if you are frying the chicken in about half an hour after marination. If you decide to marinate your chicken pieces overnight, it is not necessary to add any water while cooking it in the pressure cooker.

6. Fry the semi-cooked chicken in batches of 4 to 5 pieces (adjust according to size of pan) to ensure even browning of all the chicken pieces.

We enjoyed this dish very much where all the brilliant flavors come together and harmonize so well. The light crispy crust and succulent chicken offer a feast for the eyes and the flavors of the spices, aromatics and coconut oil highlights the tastebuds so exquisitely. Thumbs up from my man too, he enjoyed the delicious flavors of the dish.

Enjoy and bon appetite!

Recipe Courtesy: Love Bites With Joey, NDTV Good Times

Friday, 31 August 2012

Ripe Bananas and Coconut - "The Perfect Marriage" - Kuruku Kaalan


I realized something very amusing while I prepared Onasadya for the first time this year - Most of the dishes on the menu use similar ingredients and cooking methods and yet are unique in flavour and appearance! It’s amazing how slight alterations in the same ingredients can bring about such huge differences in flavors.

Kaalan is another proud entry, lined up in a Sadya, and again depending on regional differences, the consistency and ingredients of this dish vary from one place to the other. This dish is not just an integral part of the Kerala Sadya but can also be found in most Kerala homes as a dish consumed on a daily basis. The reason for the popularity of this dish is two-fold – Simplicity in preparation and it’s excellent shelf life. Kaalan can stay fresh for upto 2 weeks (I have heard that it’s flavors are enhanced as time passes) at room temperature if stored properly in good quality air-tight containers.


Though I wasn’t able to get this dish ready on the table during Onam, I tried my hand at it for the first time today. If I had known it was this simple, I definitely would have made it with the Sadya. :( That’s OK, there is always a next time! My mum prepares the most awesome Kaalan and I must say that my attempt at preparing it was quite good!

The slightly ripe bananas and the freshly grated coconut is a beautiful example of the celebration of cooking. This dish works amazingly well together and will definitely put you on top if prepared for family and friends. A sure winner, you guys HAVE to try this at home and it will leave you feeling blooming good. And so without further ado, I present to you the brilliant - Banana Kuruku Kaalan

Ingredients

Banana (1 and ¼ inch cubes) - 18 pieces (half ripe) (refer notes)
Green chillies (slit lengthwise) - 8 to 9 (adjust as per spice tolerance)
Curry leaves - 2 sprigs
Salt - to taste
Water - ½ cup
Curd/Yoghurt (sour; beaten) - 3 cups (make sure it's not too sour, but just enough)
Turmeric powder - ½ tsp
Chilli powder - ½ tsp
Coconut (grated) - 1 cup
Cumin seeds/Jeera - a pinch
Coconut oil - 4 tsp
Mustard seeds - ½ tsp
Fenugreek seeds/Uluva - 1/8 tsp
Red chillies (each slit into 2 pieces) - 3 to 4


Method

Cook together banana pieces, slit green chillies, a few curry leaves and salt in water. Cook till the banana pieces are soft.

Mix curd with a pinch of salt, turmeric and chilli powder. Pour this mixture over the banana pieces. Keep aside.

Grind grated coconut along with cumin seeds into a fine paste. Keep aside.

Heat the coconut oil in an earthen-ware pan (chatty) or any other pan that is available and splutter mustard seeds. Throw in the fenugreek seeds, curry leaves and red chillies and fry these ingredients in turn. (That is; add each ingredient one by one, frying for a few seconds. Be careful not to burn the ingredients)

Now add the ground coconut mixture to the above seasoning and saut'e on a low flame till raw smell disappears and the masala is roasted well. Remove from flame and leave to cool.

Once the roasted coconut-masala has cooled completely, add this to the prepared curd-banana mixture and stir till combined well. Place the earthen-ware pan with the Kaalan on a low flame and keep stirring carefully till the Kaalan reaches the desired consistency. (refer notes) Switch off flame and stir continuously till it becomes cold.


Store the Kaalan in a porcelain jar and use when required. (refer notes)

Notes:

1. If the bananas are not ripe enough, you can add a little powdered jaggery to the Kaalan for that required sweetness, towards the end. Do not add too much but just enough.

2. I don't like my Kaalan too thick and hence took it off the flame when the gravy was slightly loose. But for those of you who prefer a thick consistency, keep stirring the curry carefully till it thickens. Stirring the curry is very crucial because it prevents the curd/yoghurt from curdling.

3. The Kaalan can be stored in an airtight porcelain jar for a few days at room temperature (you can refrigerate it if you want to) and used when required.

Hope you all had a fantastic Onam. We had a lovely Onasadya at a small restaurant here in Bangalore, thoroughly enjoyed it. Special thanks to my lovely hubby, Reju for treating me with that yummy Sadya. He is totally amazed by my mighty love for the "Sadya"! But don't worry Reju, I still love you more!!! :)

Recipe Courtesy: The Family Cook Book by Mrs. K.M. Mathew

Wednesday, 29 August 2012

"Onam Vannallo Ponnonam Vannallo..." - Pal Payasam


Let me start today’s post by wishing all my wonderful readers a Happy and Blessed Onam 2012.

I love Kerala at this time of the year where everyone is dressed in traditional Kerala attire of Kasavu/Kerala sarees, Pattu Paavaada (skirt and blouse), Mundu etc. That lovely blend of cream and gold is a treat to the eye. And today I bring you something sweet, the Pal Payasam.


Payasam or Kheer is essentially a rice pudding, which is a traditional South Indian sweet dish. It is made by boiling rice or broken wheat with milk and sugar, and flavored with cardamom, raisins, saffron, cashewnuts, pistachios or almonds. It is typically served during a meal or also consumed alone as a dessert.

Kheer is prepared in festivals, temples, and all special occasions. Payasa or Payasam (used in South India) or payesh (used in the Bengal region) are derived from the Sanskrit word "Payas" which also means "Milk". It is prepared using milk, rice, ghee, sugar/jaggery, khoya. Some also add a little bit of heavy cream or condensed milk to give it a more rich flavor. It is often garnished with slivered almonds, cashews, raisins and pistachios. It is an essential dish in many Hindu feasts and celebrations. While the dish is most often made with rice, it can also be made with other ingredients such as vermicelli.

Rice was known to the Romans, and possibly introduced to Europe as a food crop as early as the 8th or 10th century AD, and so the recipe for the popular English Rice Pudding is believed by some to be descended from Payasam/Kheer.


The South Indian version, payasam or payasa is an integral part of a traditional South Indian meal. The South Indian payasam also makes extensive use of jaggery and coconut milk in place of sugar and milk.

In a Kerala Sadya, payasam is served at the end of the hearty meal. Hot payasam served after a delicious and elaborate feast of rice, sambar and other dishes is relished by all Malayalees. Payasam is often served on the banana leaf itself and eaten along with bananas and pappad - "Pappadam-Pazham-Payasam". Sounds wierd?! Well, that's the right way of eating payasam at an Onam Sadya. In Malayalee or Kerala cuisine, there are several different kinds of payasam that can be prepared from a wide variety of fruits and starch bases, famous ones being: Chakka Pradhaman made from jackfruit pulp, Ada Pradhaman and  Palada Pradhaman made from flat ground rice chips, Parippu Pradhaman made from split green gram, Gothambu Payasam made from broken wheat, Semiya Payasam made from vermicelli, Mambazha Payasam made from fresh ripe mangoes etc...

Ingredients

Red Rice - 1/2 cup (refer notes)
Milk - 5 cups (refer notes)
Sugar - 1 and 1/4 cups
Cardamom (crushed) - 2 (or 2 pinches of cardamom powder)


Method

Wash and clean the red rice. Keep aside.

In a pressure cooker (refer notes), add the washed rice, milk, sugar and crushed cardamom. Mix well. Cover and cook at medium to low flame. (I cooked it for 7 to 8 minutes on medium flame and the rest of the cooking was done on sim) When the steam appears, place the pressure cooker weight on it and cook for about 40 mts (preferably avoiding any whistles) on a low flame.

At the end of 40 minutes, switch off flame and keep closed for 1 and 1/2 to 2 hrs. Open the lid of the pressure cooker and give it a good stir. Check for sugar and add if necessary. (you can add 2 pinches of cardamom powder if you did not add crushed cardamoms before. Combine well.). If you find the payasam too thick, dilute it by adding boiled milk. Serve warm or cold. (I love cold payasam. My hubby and I preferred it cold, but you can always have it warm too.)

This is not the authentic payasam but a quick and easy payasam. The traditional method of preparing payasam involves more time and effort. I love this recipe for it’s simplicity and awesome flavors.


Notes:

1. In case you don't have red rice, you can always use sona masoori or basmati rice in this recipe.

2. If you are using full fat milk, you can add 4 cups of milk + 1 cup of water.

3. Make sure you use a fairly large pressure cooker because the milk tends to ooze out while cooking.

What better way to welcome Maveli this Onam! An absolutely crack-a-lackin Pal Payasam just for you! Enjoy.....Have a great day and year ahead. God bless.
Related Posts Plugin for WordPress, Blogger...