Friday, 12 August 2011

Gajar Ka Halwa/Carrot Halwa


I have made chocolate mousse and cake, biscuit puddding and other desserts but I really haven't tried my hand at Indian sweets and thus thought I'd try out something new for a change. Gajar Ka Halwa is something that I love and this was the first time I was making it. And guess what, it was an absolute hit! :) I'm on top of the world, never in my wildest dreams did I think I will be making Gajar Ka Halwa! But the sad part is I did not get a good photograph of this dish. Well, to be honest after I made it, I thought I would share the joy of our happy day with our neighbours and gave everyone a share of what I made and completely forgot about leaving some for a photograph to be put on the blog!!!! :( Sorry for that "not so very nice" photo, will do better next time.

I'm not sure whether this is the authentic or traditional method but this is how I made it with prior online instructions from my lovely sister and expert cook, Sharon and the chef at VahRehVah.com... I found this method easier because the carrot cooks faster in the pressure cooker and thus the whole process takes lesser time. This dish is something you can prepare to satisfy a sudden sweet craving.

So, friends, I thought I will end this week with a sweet note because we will be going home today to spend a few days with family. I may not be able to upload or blog for a few days and I'm definitely going to miss you all and your yummy delights. So everyone, have a pleasant and fun weekend. Happy cooking!

Ingredients

Carrots (grated fine) - 4 cups
Milk - 2 cups
Mawa/Khova - 200 gms (you can also add 2 cups of curdled milk/channe/ricotta cheese)
Sugar - 1 cup (you can add more if you like it sweeter)
Ghee - 2 tsp
Chopped Cashew & Almonds - 1 tbsp each
Golden Raisins - 1 tbsp
Cardamom (skinned & crushed fine) - 2 to 3 (change as per taste)

Method

Roast the chopped cashew, almonds and raisins in a little ghee and keep aside.

Heat ghee in a pressure cooker and add the grated carrots into it. Saut'e for 5 to 7 minutes. Now add the milk, mix and seal the pressure cooker with lid. Cook till pressure releases 4 times (4 whistles) and switch off the flame. Remove the lid when the pressure has reduced completely. At this stage, you can either transfer the mixture to a wide, deep non-stick skillet or continue to cook it in the pressure cooker itself. (if your pressure cooker is non-stick, perfect!) Add mawa/khova into it and stir continuously for about 2 to 3 minutes allowing it to cook. Now add the sugar and let it simmer on a low flame. (add sugar only after the carrots have been cooked well) Add the cardamom powder and roasted cashew, almonds and raisins into it and continue to cook till excess liquid evaporates and the mixture starts coming off the pan.

Take this in a serving plate and garnish with slivered almonds or any nuts and raisins. Serve hot or at room temperature.

Chicken Varuval


Over weekends, you will agree we all like to have some special food to enjoy family time. Two weeks back I got this recipe from a cookery show I watched on T.V and decided to prepare it on our special day. I like experimenting with chicken because it beautifully adapts with a myriad of flavors. You add lemon juice or herbs or garam masala or whatever you can think of and chicken, like a sponge will absorb and blend with it to make a delectable dish.

So here is how I cooked Chicken Varuval.

Ingredients

Chicken - 1/2 kg
Big Onion (diced) - 2 (big)
Tomato (diced) - 2 (medium)
Turmeric powder - 1/2 tsp
Red Chilli powder - 1 tbsp
Curry leaves
Coriander leaves
Oil

For Masala mix

Cinnamon (roasted & powdered fine) - 1 piece
Cloves - 4
Cardamom - 3
Coriander powder - 2 tbsp
Cumin powder - 1 tbsp
Fennel seeds (roasted & powdered) - 1/2 tsp
Coconut pieces/Thengakothu - 3 tbsp
Dry chillies - 3 to 4
Ginger (sliced) - 1 tbsp
Garlic (sliced) - 1 tbsp

Method

Grind all the ingredients under masala mix (Do not add water) into a dry paste and keep aside. (you can dry roast the solid spices first and then grind for smooth and easy grinding)

Heat oil in a wok and saut'e onions till light brown. Add curry leaves and tomatoes and saut'e till oil separates. Add turmeric powder and red chilli powder and saut'e till raw smell goes away. Now, add the chicken and combine well till all the masala is coated on the chicken. Cover and cook for 10 minutes without any water. Once the chicken is cooked, add the dry masala mix paste and mix well. Keep stirring till the raw smell of the masala goes away. The chicken pieces should be coated well with the masala. This dish has a dry consistency. Garnish with coriander leaves.

Thursday, 11 August 2011

Kerala Prawns Fry


Prawns has always been a favourite among both of us and the good thing is whenever I have made a dish with prawns, it turns out well. Reju as you know is not a very "Fishy" person but he loves prawns and this dish is now one of the most sought after items at home!

You know I always wonder how the famous saying "Stomach is the way to a man's heart" is so true! Good food definitely is one of those things that makes them happy.

Anyway getting back to the recipe, this dish is definitely one that will be licked clean off the plate. My heart warms over just talking about it. We loved it, hope you enjoy it too.

Serve with Rice or Chapathi.

Ingredients

Tiger Prawns - 250 gms
Red Chilli powder - 2 to 2 1/2 tsp
Turmeric powder - 1/2 tsp
Coriander powder - 2 to 2 1/2 tsp
Ginger & Garlic paste - 2 tsp
Curry leaves
Big Onions (finely chopped) - 2
Lime juice - 1 tbsp (or vinegar - 1 tsp)
Kokum/Kodampuli - 1 piece (soaked in water; to be used to clean the prawns)

Method

Clean, de-vein and wash the tiger prawns with kokum/kodampuli. Prick the cleaned prawns gently with a fork. Marinate it with red chilli powder, coriander powder, turmeric powder, ginger & garlic paste, salt and vinegar. Let it rest for a few hours (I keep it overnight)

Heat oil in a non-stick pan. Add onions and curry leaves and fry till golden brown. Now, add the marinated prawns and saut'e till it gets coated well with the masala. Cover and cook the prawns till done on a low flame. When cooked, take off the lid and fry till dry and masala gets coated on the prawns. Serve hot as an appetizer or snack or as a side to go with rice or warm rotis.

Mushroom Fried Rice


Today my husband and I celebrated our first wedding anniversary! Just can't believe that it's been a year since we have been married...Gosh, how time flies! Got a beautiful bouquet of flowers and a hot cup of tea from my lovely husband in the morning. It has been a perfect day! Thank you Reju, you're the best.

As you already know, we are going home tomorrow for a short holiday and I was quite busy cleaning up the refrigerator. But with the anniversary and all today, I thought how could I give my hubby boy 2-day old food from the refrigerator! So I thought I'll prepare a surprise special meal for him today and I definitely had Reju swooning, ahem! I'm glad I brought a smile on his face.

You guys want to know what I cooked today. Here goes....I made Mushroom Fried Rice, Chicken Varuval, Kerala Prawns Fry and Carrot Halwa. Phew...took sometime but it was worth it! :) All these dishes were not too complicated, simple and I must tell you, it came out quite well. Reju loved it all, he kept saying that everything was delicious and that meant a lot to me.

This recipe is originally from a show I watched on NDTV Goodtimes. But I have made a few changes here and there and I hope you like it. This rice dish with mushrooms and celery/spring onions is a meal on it's own for veggie lovers.

I'll be posting each of these recipes as different posts within the next two days. Make sure you try them. You enjoy cooking while we enjoy a nice quiet dinner at 'Copper Chimney', a new restaurant which just opened up in Bangalore.

Cheers.

Ingredients

Basmati Rice - 1 cup
Mushroom (sliced) - 200 gms
Shallots - 3 to 4
Garlic - 2 to 3 cloves
Green chilli - 1 or 2 (as per spice tolerance)
Celery/Spring onions - 2 to 3 (chop up the leaves to add towards the last)
Soya sauce - 2 tsp
Vinegar - 1 tsp
Red Chilli sauce (I used Ching's Secret Red Chilli sauce) - 1 tsp
Salt - to taste
Pepper (crushed) - 1 tsp (Add more if you like it spicy)
Oil

Method

Boil the rice with 1 tsp salt and 1 tbsp oil till bite-like. Drain and rinse under cold water. Leave in the colander and work 1 tbsp oil into it.

Heat oil in a wok and saut'e garlic and shallots for 2 to 3 minutes. Add mushrooms and celery/spring onions and saut'e over high heat, till they look glossy and reduce in quantity. (let the water content of the mushrooms disappear) Add the soya sauce, chilli sauce and vinegar and mix well. Now, add the rice and combine well. Stir till rice and veggies are well mixed. Check for salt and add more at this stage, if needed. (add about 2 tbsp of stock if you have, at this stage) Finally, add the spring onion leaves and toss for a minute or two and switch off the flame.

Wednesday, 10 August 2011

Baingan Chatpata/Egg plant Stir fry


I am in a spree to finish off my left-over veggies and meat in the refrigerator because we are going home this weekend, yippee!! :) I never stuff my refrigerator with too much food because my hubby dearest is not too fond of food kept in the refrigerator. But doesn't work well for him everyday, poor thing! He does get 2-day old "fresh" food sometimes... :)

So this dish is something I just created today afternoon with a few eggplants. (baingan/brinjal) It's quick and easy and goes well with chapathi and white rice.

Ingredients

Baingan/Brinjal - 5 to 6 (medium)
Big Onion (diced) - 2 (big)
Ginger & Garlic paste - 1 1/2 to 2 tsp
Aamchur powder - 1/4 to 1/2 tsp
Red Chilli powder - 2 tsp (alter as per spice tolerance)
Turmeric powder - 1/4 to 1/2 tsp
Coriander powder - 1 1/2 tsp
Salt - to taste
Sugar - a pinch
Water
Oil

Method

Cut the baingan/brinjal into medium size chunks and marinate it with aamchur powder. Keep aside. Heat oil in a pan and add onions. Once the onions turn translucent and reduce in quantity, add a pinch of sugar to slightly caramelize the onions. Saut'e till golden brown. Add the ginger & garlic paste and fry for a few minutes. Throw in the chilli powder, coriander powder and turmeric powder and fry for 1 or 2 minutes. Be careful not to burn the powders. Now add the marinated baingan/brinjal chunks and salt and toss till combined well with the onion and spice mixture. Sprinkle enough water and mix well. Cover and cook till done. Once cooked, stir fry till dry and masala is coated well on the baingan/brinjal.

Tuesday, 9 August 2011

Grilled Fish Sammies


We all enjoy a nice grilled cheese sandwich at anytime of the day. Sandwiches are loved by all, be it big or small. Once you factor in the basic requirements of butter, bread and cheese of the classic grilled cheese sandwich, one only needs a little imagination to take these sandwiches to the next level to unleash their true gourmet potential.

I was just thinking about what I could make for dinner today and suddenly I thought of sandwiches. Simple and easy. I love sandwiches for any meal, breakfast, brunch, lunch, snack, dinner....anything!

I had a few pieces of fish left in my freezer and thought why not make a few grilled fish sandwiches! Looking to make something a bit more fancy than your typical everyday grilled cheese?

Here is the perfect dish. It is delicious and filling too.

Ingredients

Fish (Seer fish) - 7 to 8 pcs
Lime - 2 tbsp (or Vinegar - 1 tbsp)
Ginger - a small piece
Salt - to taste
Water - 1/2 to 3/4 cup
Garlic (crushed) - 3 to 4 cloves
Big Onion (chopped fine) - 1
Green chillies - 2 to 3 (as per your spice tolerance)
Tomato (chopped fine) - 1 (big)
Pepper powder - 1 tsp (I add more. You can add as per your spice tolerance)
Cream Cheese (Cheese spread) - 4 tbsp (you can add or reduce as you like)
Oil

Method

For the filling

Cook the fish with Lime juice/vinegar, ginger, salt and water until done. Throw away the piece of ginger and leave to cool. Once cooled, flake the fish pieces into tiny bits and keep aside.

Heat oil in a wok. Add garlic, green chillies and onions and saut'e till onions turn light brown. Then add tomato and saut'e for about 2 minutes. Add the flaked fish pieces along with pepper and salt and combine with the other ingredients. Switch off the flame and keep aside.

For the sandwiches

Take bread slices and lightly butter them. (optional) Take the cream cheese in a bowl and gently whisk it. Add the fish mixture into it and mix. Adjust salt.

Take the buttered bread slices and place them on the grill, spread the fish and cheese mixture onto it. Place another buttered slice of bread on top and grill for about 3 to 4 minutes, just to give it that crisp. And there you have it, Grilled Fish Sammies, ready-to-eat! Enjoy!

Monday, 8 August 2011

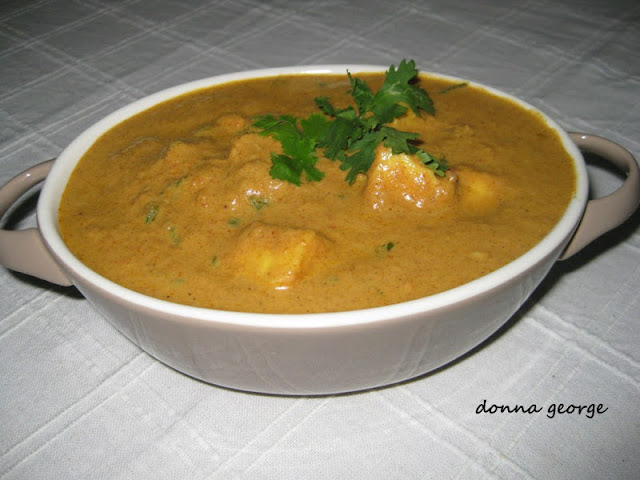
Paneer Curry - Kerala Style


Today's recipe was shared with me by my sister, Sharon's mom-in-law, Mary aunty. Mary aunty is a wonderful cook and a lovely person. Lots of fun to talk to. She has quite a few masterpiece recipes to her credit. I love her cookies (of diferent kinds), puddings, pies and much much more. She and I both believe in cooking made simple and thus this dish goes by the same principle too.

Most days, I keep worrying about what new dish I can make that goes well with chapathis. Well this dish is definitely one that can be tried out once in a while.

Paneer which has always been the fort'e of North Indian cuisine has now found its way to the South too with this simple dish which will surely brighten up your dreary days. What do you think about cooking paneer, Kerala style?! Sounds cocky, I know but this is definitely worth a try. The fresh aromatics and the rich coconut milk gravy makes this dish a unique one.

I like this recipe especially for its simplicity, unlike most other paneer dishes.

Hope you enjoy this paneer dish.

Ingredients

Paneer - 200 gms
Onion (ground) - 1 (big)
Garlic (ground) - 3 to 4 cloves (plump)
Meat masala - 3 to 4 tsp (add more to the gravy if needed)
Tomato (ground) - 3 (medium)
Water - 1 & 1/2 cups + 1/2 cup for gravy
Milk - 1/2 cup
Thick Coconut milk - 1 cup
Cashew paste - 10 (soaked in a little water/milk for 1/2 an hour)
Vinegar - 1/2 tsp
Coriander leaves
Salt - to taste
Oil

Method

Heat water (excluding the water for gravy) in a pan with a pinch of salt and keep aside. In another pan, heat a little oil and fry the paneer pieces gently. Once fried, throw the paneer into the salt water and keep aside. Grind onion with garlic and meat masala and keep aside. Grind tomatoes and keep aside.

Take a pan, heat oil and fry the ground onion mixture on a low flame for a few minutes. (till the water content reduces and it starts getting off the pan) Add ground tomatoes into this and fry till oil separates. Now add the paneer pieces and combine well. Add the milk and water (for gravy) and cook for a few minutes. Then, add the thick coconut milk, cashew paste and a few coriander leaves into it and cook for a few more minutes. Do not boil. Add vinegar and switch off flame.

Notes: Frying the paneer pieces is optional. I normally don't fry it.

You can also fry a few curry leaves in oil and add it to the dish towards the last. It add to the flavour of the dish. For those who are health conscious, this step can be avoided.

Source: Our sweet Mary Aunty

Saturday, 6 August 2011

Baingan Bartha


Baingan Bartha is a dish that was introduced to me after marriage by my lovely sister, Sharon. Mother of two wonderful children, she is a super cook and a super mom! I remember when we were both growing up, both of us always were so uninterested in cooking. Ma used to constantly call us both to the kitchen to watch her cook, but we never wanted to learn then! She was always so worried what we would do after marriage! :)

Anyway, getting back to the recipe, this is a super easy recipe and quite different from the original Bartha recipe.

With the weather so gloomy and dull yesterday, I had no heart too cook anything too elaborate. And, so I put together Baingan Bartha. The delicious colour and taste makes the effort worthwhile. This is one of our favourites. Hope you enjoy it too.

Here is the recipe.

Ingredients

Eggplant (baingan) - 1 (big)
Big Onion - 2 to 3
Tomato - 2
Green chillies - 2 to 3 (as per spice tolerance)
Garlic - 5 to 6 cloves
Garam masala powder - 1 tsp
Pickle powder - 1 tsp
Red chilli powder - 1 tsp
Peanuts (powdered) - 3 to 4 tbsp
Cumin seeds/Jeera - a pinch
Salt - to taste
Coriander leaves
Ghee

Method

Wash and pat dry the eggplant and rub oil on it. Wrap with foil paper and bake for about 45 minutes to 1 hour in a 200°celsius or a 400°F oven. Once the eggplant is cooked through and is fork tender, take out the baking dish and immerse the roasted eggplant in cold water. (this helps the skin to come off easily) When it has cooled, peel off the skin and mash the eggplant well. Keep aside.

Heat oil in a wok and splutter mustard and cumin seeds. Add garlic, green chillies and onions and sauté till golden brown. Once onions have browned well, add all the powders and sauté till raw smell goes away. Add tomatoes and sauté till oil floats. Then, add the eggplant/baingan into it and mix well. Add peanut powder into it and combine well till the eggplant/baingan is coated with the whole mixture. Finally, add ghee and coriander leaves and mix well. Switch off the flame.

Source: My loving sister, Sharon

Aloo ka Raita


Yoghurt is always a must at home with any meal. Yesterday I made this simple raita for dinner and we loved it. Very refreshing and wholesome. I love the "khatta-meetha" blend in some of the dishes and this raita is a perfect example of the same. The tanginess of the spices and sweetness of sugar makes this dish lip smacking good. Enjoy!

Ingredients

Potatoes (boiled, peeled & diced) - 2 cups
Yoghurt - 2 cups
Salt -to taste
Black Pepper powder - 1/4 tsp
Cumin powder (roasted) - 1 to 2 tsp
Red Chilli powder - 1/4 tsp
Coriander leaves (chopped) - 2 tbsp + little more for garnish
Sugar - 1/2 tsp

Method

Beat the yoghurt till smooth and pour into the serving dish. Add salt, black pepper powder, 1/2 of the cumin powder and coriander leaves to the potatoes and mix well. Transfer this potato mix into the yoghurt and garnish with rest of the cumin powder, red chilli powder, sugar and coriander leaves. Serve chilled.

Source: NDTV Good Times

Friday, 5 August 2011

Carrot Milk Shake


Surprised?! Well, it's true. This is probably one of the healthiest milk shakes I have ever had. I am usually not too big on milk shakes. But to day when I was chatting with my mom-in-law, she gave me this idea of an absolute healthy milk shake. I was thrilled and decided to try it today itself. And I must say it is healthy.

My lovely mom-in-law, Amma is a fabulous cook and I normally refer to her as "Express Cook" to others. She is so fast and doesn't waste any much time in the kitchen. I like that! I don't believe in slogging in the kitchen the whole day when you can do other fun things too. Cooking is all about fun, and what makes it fun is quick and easy cooking. My mom-in-law is a wizard at easy cooking. She gives me fun tips which reduces a lot of load in the kitchen. A lot of her cooking and dishes have inspired me and this post is dedicated to her. This is quite an easy drink and a no brainer. However I decided to write about it because if you are like me, you will be inspired to try something very healthy once in a while!

This recipe is for 1 glass/serving. Here is the recipe.

Ingredients

Carrots (grated) - 1 big
Chilled Milk - 3/4 of a glass
Crushed Ice - few
Honey - to taste

Method

Grind the carrot into a smooth paste by adding a little milk. Now whip this mixture with the rest of the milk, ice and honey. Garnish with fresh cream and a piece of carrot or however your imagination leads you. Enjoy!

Notes: For the healthier version, I have used skimmed milk and honey.

You can use full-fat milk instead of skimmed milk and sugar instead of honey.

Source: My Amma

Crispy Chicken


Ingredients

Chicken - 10 pieces

For Marinade

Green Chilli sauce - 1 tbsp
Tomato sauce - 1 tbsp
Chilli Garlic sauce - 1 tbsp
Soya sauce - 1/2 tbsp
Pepper powder - 1 tsp
Salt - to taste

For Batter

Maida - 1/2 cup
Corn flour - 1/2 cup
Red chilli powder - 1/4 to 1/2 tsp (as per spice tolerance)
Eggs (beaten) - 1 (optional)
Salt - to taste
Pepper - 1/4 to 1/2 tsp
Ajinomoto - a pinch
Water - just enough to for a semi-thick batter

Method

Make gashes in the chicken and marinate the chicken pieces with the ingredients mentioned under marination. Keep aside for 2 to 3 hours. (if you are keeping it overnight, keep it in the refrigerator)

Make a semi-thick batter with the ingredients mentioned under batter. Heat oil in a wok. Once the oil is hot and bubbling, dip the chicken pieces in the batter and deep fry till golden brown. Serve piping hot as a starter or as a side-dish to go with some lovely rice or noodles.

Source: Mom

Thursday, 4 August 2011

Chicken Soup for the soul!


My style of cooking is keeping it simple, fresh and maintaining a balance in a dish. This simple and refreshing chicken soup is a classic example of such cooking. I always enjoy a hot chicken broth at any time of the day, it keeps makes me feel fresh and healthy because of the nice balance of veggies and chicken/meats in it. Of course you can always make a good veggie soup with the same recipe by just omitting the chicken/meats in it.


So here goes the recipe.


Ingredients


Chicken (cooked & shredded) - 1/2 to 3/4 cup

Chicken stock - 1 cup

Garlic (crushed) - 3 to 4 cloves

Shallots (crushed) - 5 to 6

Carrot - 1 (small)

Cabbage - 2 to 3 leaves

Cauliflower - 3 to 4 florets

Salt - to taste

Pepper - 1 tsp

Oil - 1/2 tbsp

Spring onions

Water - as required (depending on quantity required. That is, if you are adding 1 cup/bowl stock, then you need to add 3 cups/bowls of water to get 4 bowls of soup)


Method


Heat oil in a cooking pot and sauté garlic and shallots for about 2 to 3 minutes on a low flame. Add chicken stock and water and let it boil. When it comes to a boil, add carrot, cabbage and cauliflower and close to cook for a few minutes. Once the veggies have been cooked, add the cooked chicken along with pepper, salt and ajinomoto and cover and cook for about 1 minute on a medium flame and 1 or 2 minutes on a low flame with the lid open. Finally, add the spring onions, cook for a minute or two and switch off flame.


Notes: Cook the chicken with salt, pepper and a small piece of ginger because ginger enhances flavour of the stock.

Soto Ayam


Authentic chinese food is always so colourful and looks exotic. My love for this food though goes beyond the colour and how it looks. I am addicted to chinese food! But to tell you the truth, I haven't really experimented much with chinese food in my kitchen because the one or two times I tried, it wasn't very successful :(

This dish though is not an authentic chinese dish, more of a chinese-malay dish, but has it's origin from Malaysia. This was something my mom used to make on a weekend. Weekends were the time when she would always cook something special for us, oh and I must say, she used to cook up a storm. We used to just gobble up all that she made and this was one dish we all loved. My mom grew up in Brunei and spent a lot of wonderful years there as a young girl. She always had such interesting stories to tell us about the Sultan of Brunei, the lovely people and of course most importantly the yummy food! Her descriptions of the food was so mouth watering! She would talk about the umpteen number of small open air food stalls which would serve food ranging from hot soups with wantons to delicious spicy noodles and different varieties of rice. Food in Brunei has got a lot of influence from Malaysia because the Malay population constitutes a large part of the population there. (atleast at the time when my mum was there) So this dish is a re-creation of the Soto Ayam my mom used to enjoy at the busy open air food stalls there with a few changes here and there! In a nutshell, her version of Soto Ayam. And she definitely nailed it, I must tell you.

This dish is usually served with a simple chicken soup, white rice (basmati rice) and crispy chicken (batter fried chicken). The chicken soup is poured into the rice with a dash of soy sauce and eaten with the rest of the accompaniments and this is a complete balanced meal.

Light and full of flavour, this dish is an absolute hit. I know you only have my word to go by but try it for sure, you will not be disappointed.

Ingredients

Chicken (cooked & shredded) - 250 gms
Chicken stock - 3 to 4 tbsp
Dry red chillies - 4 to 5
Garlic - 5 to 6 cloves
Shallots - 5 to 6
Ginger - 1/2 inch piece
Pepper - as per spice tolerance
Salt - to taste
Ajinomoto - a pinch
Spring Onion - small bunch

Method

Pound garlic, ginger, shallots and dry red chillies and keep aside.

Heat oil in a wok and add dry red chillies, garlic, ginger, shallots and turmeric. Saut'e until onions turn light brown. Add the cooked chicken along with pepper and salt and saut'e for a few minutes. At this stage, add the chicken stock and cook on a low flame for a few minutes. Finally, add a pinch of ajinomoto and spring onions and toss for a few more minutes and switch off the flame.

Serve with basmati rice, chicken soup and crispy chicken.

Notes: Cook the chicken with pepper, salt and a piece of ginger because ginger enhances the flavour of the chicken as well as the stock.

Source: My Mom

Wednesday, 3 August 2011

Kerala Pepper Chicken


I am just the loving the weather out here in Bangalore, cool weather with occasional stormy rains, wow! I hope you are enjoying good weather where ever you are as much as I am. This morning, enjoying the cool breeze and bright sunlight finding it's way through the balcony and with some of my favourite music playing, I cooked. Have you ever tried cooking with music? It's wonderful.

So what did I cook? I made Kerala Pepper chicken, Kovakka Mezhukuperatti and Moru Kachiyathu.

Now, getting down to the recipe. I got this recipe from one of the cookery shows I watched sometime back. This Kerala Pepper Chicken is so scrumptious and extremely diverse because it goes well with rice, parathas, Kerala porottas and what not. And what makes it even more attractive is the simplicity of this dish. I promise you, you can't go wrong with this!

Every time I make this dish, we lap it up like we have been starving for days. So go ahead and try this and enjoy!

Ingredients

Chicken - 1 kg
Big Onions (diced) - 6
Tomato (diced) - 3
Green chillies - 6 to 8 (as per spice tolerance)
Crushed pepper corns - 3 tsp
Ginger & Garlic paste - 2 tsp
Garlic (crushed) - 6 to 8 cloves
Turmeric powder - 1/4 tsp
Curry leaves - 2 to 3 sprigs
Salt - to taste
Coconut oil

Method

Make gashes in the chicken and marinate it with crushed pepper, ginger & garlic paste, turmeric powder and salt. Keep aside for 1 or 2 hours. Pressure cook the chicken for 1 whistle. Heat oil in a wok, and saut'e green chillies, crushed garlic, curry leaves, onions and turmeric until onions turn golden brown. Throw in the tomatoes and saut'e till oil separates. Now, add the cooked chicken pieces and let it cook on a low flame till gravy is dry.

Notes: In case you have stock left after cooking the chicken in the pressure cooker, pour it towards the end while preparing the dish.

Tuesday, 2 August 2011

Kovakka (Ivy Gourd) Mezhukuperatti


Choru (Rice), Thoran (Veggie stir fried with coconut), Mezhukuperatti (veggie saute'ed/fried in oil), a non-veg dish and a curry constitutes a typical Kerala meal. Yummy! I enjoy a lovely Kerala meal anytime of the day. It's simple but there is something about it that makes you want to eat it again, again and again...! I actually enjoy making the normal rice and curry. (doesn't sound too exciting, I know)

I particularly love veggies and am not a hard core non-vegetarian. I can go all veggie at anytime but always end up cooking a non-veg dish too because my hubby, "the foodie" loves non-veg.

This veggie dish is an all time favourite of mine because I love Kovakka (Ivy Gourd) in any form! And like we treat most veggies in our cuisine, I sauteed this tasty veggie. It's safe to say it's universally preferred! The delectable flavours of this dish comes from the coconut oil, onions and chillies used in it.

Hope you enjoy this simple dish.

Ingredients

Kovakka/Ivy Gourd (sliced) - 3 cups
Big Onion (sliced) - 2 (medium size) {or small onions - 9 to 10}
Garlic - 7 to 8 cloves
Curry leaves - 2 to 3 sprigs
Red chilli powder - 3/4 tsp
Pepper powder - 1/2 tsp
Turmeric powder - 1/4 tsp
Salt
Coconut oil - 2 tbsp

Method

Take a cooking pot and add all the ingredients (except coconut oil) into it along with 2 to 3 sprinkles of water. Cover and cook till done.

Now heat oil in a non-stick pan and saut'e/stir fry the vegetable till light brown.

Now wasn't that quick?!! :)

Source: Mama
Related Posts Plugin for WordPress, Blogger...